Feature Coming Soon!
The newsletter functionality is under development.
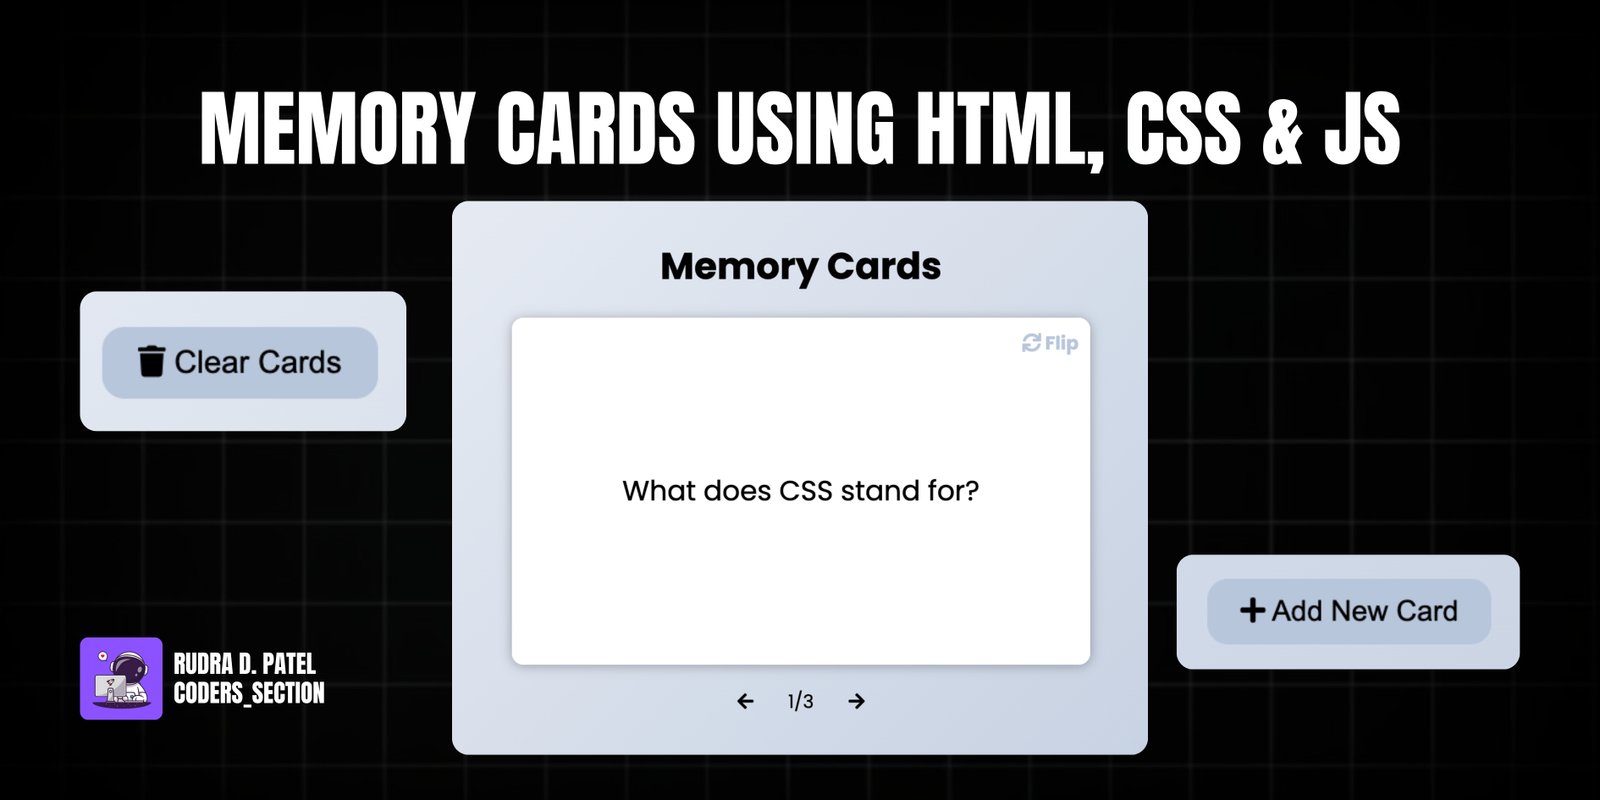
This project creates an interactive Memory Card application using HTML, CSS, and JavaScript. It functions as a flashcard system where users can view questions on the front of a card and flip it to reveal the answer on the back. The application allows users to navigate through a set of cards, add new cards with custom questions and answers, and clear all existing cards.
Key features include a dynamic card display with a 3D flip animation, navigation buttons to move between cards, and a form to add new flashcards. The current card number is displayed, providing clear context. This project is a great example of building a practical web application that combines user interface design with data management (albeit in a simple, in-memory fashion in this version) and interactive animations.
The HTML structure for the Memory Cards application is designed to support the flashcard display, navigation, and card management features. It includes a "Clear Cards" button and a main heading with an "Add New Card" button. The `cards-container` div will dynamically hold the memory cards. Navigation buttons (`prev` and `next`) and a `current` paragraph for card numbering are also present. The `add-container` div, initially hidden, contains a form for adding new cards, including input fields for `question` and `answer` (textareas) and an "Add Card" button. Each dynamically created card will have an `inner-card` with `inner-card-front` and `inner-card-back` for the question and answer, respectively. This structure facilitates the interactive flipping and management of flashcards.
<!DOCTYPE html>
<html lang="en">
  <head>
    <meta charset="UTF-8" />
    <meta name="viewport" content="width=device-width, initial-scale=1.0" />
    <link
      rel="stylesheet"
      href="https://cdnjs.cloudflare.com/ajax/libs/font-awesome/5.15.1/css/all.min.css"
      integrity="sha512-+4zCK9k+qNFUR5X+cKL9EIR+ZOhtIloNl9GIKS57V1MyNsYpYcUrUeQc9vNfzsWfV28IaLL3i96P9sdNyeRssA=="
      crossorigin="anonymous"
    />
    <link rel="stylesheet" href="style.css" />
    <title>Memory Cards</title>
  </head>
  <body>
    <button class="clear btn" id="clear">
      <i class="fas fa-trash"></i> Clear Cards
    </button>
    <h1>
      Memory Cards
      <button id="show" class="btn">
        <i class="fas fa-plus"></i> Add New Card
      </button>
    </h1>
    <div id="cards-container" class="cards"></div>
    <div class="navigation">
      <button id="prev" class="nav-button">
        <i class="fas fa-arrow-left"></i>
      </button>
      <p id="current"></p>
      <button id="next" class="nav-button">
        <i class="fas fa-arrow-right"></i>
      </button>
    </div>
    <div id="add-container" class="add-container">
      <h1>
        Add New Card
        <button id="hide" class="btn btn-small btn-ghost">
          <i class="fas fa-times"></i>
        </button>
      </h1>
      <div class="form-group">
        <label for="question">Question</label>
        <textarea id="question" placeholder="Enter Question..."></textarea>
      </div>

      <div class="form-group">
        <label for="answer">Answer</label>
        <textarea id="answer" placeholder="Enter Answer..."></textarea>
      </div>

      <button id="add-card" class="btn btn-margin">
        <i class="fas fa-plus"></i> Add Card
      </button>
    </div>
    <script src="script.js"></script>
  </body>
</html>
The CSS for the Memory Cards application provides a clean, interactive, and visually appealing design. It imports the "Poppins" font and defines root variables for consistent colors and a gradient background for the `body`. Buttons are styled with a modern look, including hover effects. The `.cards` container uses `perspective` to enable the 3D flip animation of individual `.card` elements. Each `.card` is positioned absolutely, initially hidden (`opacity: 0`) and transformed, then becomes `active` with `opacity: 1` and no transformation. The `left` and `right` classes apply horizontal translations and rotations for navigation. The `inner-card` uses `transform-style: preserve-3d` for the flip effect, and the `show-answer` class rotates it 180 degrees. The `inner-card-front` and `inner-card-back` are styled for their respective content, with `backface-visibility: hidden` to ensure only one side is visible at a time. A "Flip" icon is added using pseudo-elements. The `navigation` and `add-container` sections are also styled for their functionality, with the `add-container` animating its visibility. Overall, the CSS creates a fluid and engaging user experience for the flashcard application.
@import url("https://fonts.googleapis.com/css2?family=Poppins:wght@200;400;700&display=swap");

:root {
  --primary-color: #8e44ad;
  --background-color: #b8c6db;
  --secondary-background-color: #f5f7fa;
  --light-color: #fff;
  --border-color: #aaa;
}

* {
  box-sizing: border-box;
}

body {
  background-color: var(--background-color);
  background-image: linear-gradient(315deg, var(--background-color) 0%, var(--secondary-background-color) 100%);
  font-family: "Poppins", sans-serif;
  display: flex;
  flex-direction: column;
  align-items: center;
  justify-content: center;
  height: 100vh;
  overflow: hidden;
  margin: 0;
}

h1 button {
  position: absolute;
  top: 2rem;
  right: 2rem;
  z-index: 2;
}

.btn {
  cursor: pointer;
  background-color: var(--background-color);
  border: none;
  border-radius: 0.625rem;
  font-size: 0.875rem;
  padding: 0.5rem 1rem;
}

.btn-small {
  font-size: 0.75rem;
  padding: 0.25rem 0.5rem;
}

.btn-ghost {
  border: 0;
  background-color: transparent;
}

.btn-margin {
  margin-top: 1.25rem;
  width: 28.125rem;
  max-width: 90%;
}

.btn:hover {
  background-color: var(--primary-color);
  color: var(--light-color);
}

.btn:focus, .navigation .nav-button:focus {
  outline: none;
}

.clear {
  position: absolute;
  bottom: 2rem;
  left: 2rem;
}

.cards {
  perspective: 1000px;
  position: relative;
  width: 31.25rem;
  max-width: 90%;
  height: 18.75rem;
}

.card {
  background-color: var(--light-color);
  border-radius: 0.625rem;
  position: absolute;
  font-size: 1.5rem;
  top: 0;
  left: 0;
  width: 100%;
  height: 100%;
  opacity: 0;
  transform: translateX(50%) rotateY(-10deg);
  transition: transform 0.4s ease, opacity 0.4s ease;
}

.card.active {
  cursor: pointer;
  opacity: 1;
  z-index: 10;
  transform: translateX(0) rotateY(0deg);
}

.card.left {
  transform: translateX(-50%) rotateY(10deg);
}

.inner-card {
  box-shadow: 0 1px 10px rgba(0, 0, 0, 0.3);
  border-radius: 0.625rem;
  position: relative;
  width: 100%;
  height: 100%;
  transform-style: preserve-3d;
  transition: transform 0.4s ease;
}

.card.show-answer .inner-card {
  transform: rotateX(180deg);
}

.inner-card-front, .inner-card-back {
  backface-visibility: hidden;
  background-color: var(--light-color);
  border-radius: 0.625rem;
  position: absolute;
  top: 0;
  left: 0;
  display: flex;
  align-items: center;
  justify-content: center;
  width: 100%;
  height: 100%;
}

.inner-card-front {
  transform: rotateX(0deg);
  z-index: 2;
}

.inner-card-back {
  transform: rotateX(180deg);
}

.inner-card-front::after, .inner-card-back::after {
  content: '\f021  Flip';
  font-family: 'Font Awesome 5 Free', 'Poppins', sans-serif;
  position: absolute;
  top: 0.625rem;
  right: 0.625rem;
  font-weight: bold;
  font-size: 1rem;
  color: var(--background-color);
}

.navigation {
  display: flex;
  margin: 1.25rem 0;
}

.navigation .nav-button {
  border: none;
  background-color: transparent;
  cursor: pointer;
  font-size: 1rem;
}

.navigation .nav-button:hover {
  transform: scale(1.2)
}

.navigation p {
  margin: 0 1.5rem;
}

.add-container {
  background-color: var(--secondary-background-color);
  border-top: 2px solid var(--border-color);
  display: flex;
  flex-direction: column;
  align-items: center;
  justify-content: center;
  padding: 0.625rem 0;
  position: absolute;
  top: 0;
  bottom: 0;
  width: 100%;
  opacity: 0;
  z-index: -1;
  transition: all 0.3s ease;
}

.add-container.show {
  opacity: 1;
  z-index: 2;
}

.add-container h3 {
  margin: 0.625rem 0;
}

.form-group {
  display: flex;
  flex-direction: column;
  align-items: center;
  justify-content: center;
}

.form-group label {
  display: block;
  margin: 1.25rem 0 0.625rem;
}

.form-group textarea {
  border: 1px solid var(--border-color);
  border-radius: 0.625rem;
  font-size: 1rem;
  padding: 0.75rem;
  width: 31.25rem;
  max-width: 90%;
}
The JavaScript for the Memory Cards application manages the dynamic creation, display, navigation, and addition of flashcards. It starts by selecting all necessary DOM elements and initializing `currentActiveCard` to track the current card and `cardsElement` to store references to the card elements. The `cardsData` array holds the initial set of questions and answers. Key functions include:
Event listeners are set up for:
The script concludes with an initial call to `createCards()` to populate the display when the page loads. This comprehensive JavaScript provides a fully functional and interactive memory card application.
const cardsContainer = document.getElementById("cards-container");
const prevButton = document.getElementById("prev");
const nextButton = document.getElementById("next");
const currentElement = document.getElementById("current");
const showButton = document.getElementById("show");
const hideButton = document.getElementById("hide");
const questionElement = document.getElementById("question");
const answerElement = document.getElementById("answer");
const addCardButton = document.getElementById("add-card");
const clearButton = document.getElementById("clear");
const addContainer = document.getElementById("add-container");

let currentActiveCard = 0;
const cardsElement = [];

const cardsData = [
  {
    question: "What does CSS stand for?",
    answer: "Cascading Style Sheets",
  },
  {
    question: "What year was JavaScript launched?",
    answer: "1995",
  },
  {
    question: "What does HTML stand for?",
    answer: "Hypertext Markup Language",
  },
];
// const cardsData = getCardsData();

function createCards() {
  cardsData.forEach((data, index) => createCard(data, index));
}

function createCard(data, index) {
  const card = document.createElement("div");
  card.classList.add("card");
  if (index === 0) card.classList.add("active");
  card.innerHTML = `
    <div class="inner-card">
        <div class="inner-card-front">
        <p>${data.question}</p>
    </div>
    <div class="inner-card-back">
        <p>${data.answer}</p>
    </div>
    </div>
  `;
  card.addEventListener("click", () => card.classList.toggle("show-answer"));
  cardsElement.push(card);
  cardsContainer.appendChild(card);
  updateCurrentText();
}

function updateCurrentText() {
  currentElement.innerText = `${currentActiveCard + 1}/${cardsElement.length}`;
}

// function getCardsData() {
//   const cards = JSON.parse(localStorage.getItem("cards"));
//   return cards === null ? [] : cards;
// }

// function setCardsData(cards) {
//   localStorage.setItem("cards", JSON.stringify(cards));
//   history.go(0);
// }

// Event Listeners
nextButton.addEventListener("click", () => {
  cardsElement[currentActiveCard].className = "card left";
  currentActiveCard++;
  if (currentActiveCard > cardsElement.length - 1) {
    currentActiveCard = 0;
  }
  cardsElement[currentActiveCard].className = "card active";
  updateCurrentText();
});

prevButton.addEventListener("click", () => {
  cardsElement[currentActiveCard].className = "card right";
  currentActiveCard--;
  if (currentActiveCard < 0) {
    currentActiveCard = cardsElement.length - 1;
  }
  cardsElement[currentActiveCard].className = "card active";
  updateCurrentText();
});

showButton.addEventListener("click", () => addContainer.classList.add("show"));
hideButton.addEventListener("click", () =>
  addContainer.classList.remove("show")
);

addCardButton.addEventListener("click", () => {
  const question = questionElement.value;
  const answer = answerElement.value;
  if (question.trim() && answer.trim()) {
    const newCard = { question, answer };
    createCard(newCard);
    questionElement.value = "";
    answerElement.value = "";
    addContainer.classList.remove("show");
    cardsData.push(newCard);
    // setCardsData(cardsData);
  }
});

clearButton.addEventListener("click", () => {
  //   localStorage.clear();
  cardsContainer.innerHTML = "";
  currentElement.innerText = "";
  //   history.go(0);
});

// Init
createCards();
Watch a live demonstration of the Memory Cards application below.
This Memory Cards project offers a robust and engaging solution for creating interactive flashcards. Its intuitive design, combined with dynamic content and smooth animations, makes it an excellent tool for learning and memorization. The project effectively demonstrates how to build a practical web application that manages user-generated content and provides a fluid user experience.
You can easily customize this component by:
For persistent storage of flashcards, consider using the browser's `localStorage` API or integrating with a cloud-based database like Firebase Firestore. This allows users to save their custom cards and access them across sessions.
Click the button below to download the full source code. Download will be ready in 10 seconds.
Receive coding tips and resources updates. No spam.
We respect your privacy. Unsubscribe at any time.