1. INTRODUCTION TO MERN STACK
1.1 What is MERN Stack?
- MERN Stack is a set of four powerful technologies used to build full-stack web applications.
- The word "MERN" is made from the first letters of each tool:
- M: MongoDB
- E: Express.js
- R: React
- N: Node.js
- All four work together to help developers build apps that have a front-end (what the user sees) and a back-end (how data is stored and managed).
- MERN is full JavaScript-based, so if you know JavaScript, you can learn the entire stack easily.
1.2 Components of MERN (MongoDB, Express.js, React, Node.js)
Let's understand each part of MERN Stack one by one:
MongoDB (Database)
- It stores data in a format similar to JSON (key-value pairs).
- It's a NoSQL database, which means it's flexible and easy to use.
- Example: You can store user details, product data, messages, etc.
Express.js (Backend Web Framework)
- It runs on top of Node.js.
- It handles server-side logic like routes, requests, and responses.
- Helps you create APIs (paths that send/receive data).
- Example: When someone logs in, Express handles the login request.
React (Frontend Library)
- Created by Facebook.
- Helps you build the user interface (UI) - the buttons, forms, pages users see.
- It uses something called components to make UI reusable.
- Example: A login form or product list page.
Node.js (Runtime Environment)
- Lets JavaScript run outside the browser - on a server.
- It allows you to build the back-end part using JavaScript.
- It's very fast and handles many tasks at once.
1.3 Why Use the MERN Stack?
Here are simple reasons why developers like the MERN Stack:
- Single Language - You only need to know JavaScript for front-end and back-end.
- Free and Open Source - All tools are free to use and have big communities.
- Fast Development - React and Node.js are fast and make apps responsive.
- Real-Time Updates - You can easily create apps that update without refreshing (like chat apps).
- Strong Community Support - Thousands of tutorials, tools, and answers are available.
1.4 MERN vs Other Stacks (MEAN, LAMP, etc.)
Here's a simple comparison:

- MERN uses React (easy, fast)
- MEAN uses Angular (more structured)
- LAMP is old and uses PHP & MySQL
Why MERN wins?
- It's modern, flexible, JavaScript-based, and great for building dynamic web apps like social media, eCommerce, and dashboards.
1.5 Real-World Use Cases
Here are some examples where MERN Stack is used:
- Social Media Apps: Like Facebook or Instagram - posts, likes, comments.
- eCommerce Websites: Like Amazon - users, products, payments, carts.
- Blog Platforms: Like Medium - write, edit, comment on articles.
- Project Management Tools: Like Trello - tasks, users, drag-drop features.
- Real-Time Chat Apps: Like WhatsApp - messages update instantly.
2. NODE.JS BASICS
2.1 What is Node.js?
- Node.js is a JavaScript runtime - this means it lets you run JavaScript code outside the browser, like on your computer or a server.
- Before Node.js, JavaScript could only run in browsers (like Chrome). But with Node.js, you can use JavaScript to:
- Create servers
- Handle files
- Connect to databases
- Build full web applications
- Node.js is built on Chrome's V8 engine, which makes it very fast and non-blocking (it doesn't wait for one task to finish before starting the next).
In simple words: Node.js lets you use JavaScript to build the backend of your website.
2.2 Installing Node.js and npm
To write Node.js code on your computer, you first need to install it.
Step-by-Step:
- Go to https://nodejs.org.
- Download the LTS (Recommended) version
- Install it like any other software
After installing, check if it worked:
- Open Command Prompt or Terminal
- Type:
node -v
- This shows the Node.js version
- Then type:
npm -v
- This shows the npm version
What is npm?
- npm = Node Package Manager
- It helps you install and manage packages (extra tools/code written by others)
2.3 Creating Your First Node.js App
Let's build a simple Node.js app:
Step 1: Create a file
- Make a file called
app.js
Step 2: Add this code
console.log("Hello, Node.js!");
Step 3: Run it
- Open terminal, go to the folder, and run:
node app.js
Hello, Node.js!
- That means Node.js is working!
2.4 Common Built-in Modules
Node.js has some built-in tools (called modules). You don't need to install them. Just use them with require().
Some useful ones:
- fs (File System) - For reading/writing files
const fs = require('fs');
fs.writeFileSync("hello.txt", "This is Node.js");
- http - For making a simple server
const http = require('http');
const server = http.createServer((req, res) => {
  res.end("Hello from server");
});
server.listen(3000);
- path - To work with file paths
const path = require('path');
console.log(path.basename('/folder/file.txt')); // file.txt
2.5 Using External Packages (npm install)
You can add extra features to your app by using packages created by others.
Example: Install a package called chalk (adds colors to console output)
- First, run this in terminal:
npm init -y
- It creates a
package.json file (tracks your project and packages)
- Install chalk:
npm install chalk
- Use it in your code:
const chalk = require('chalk');
console.log(chalk.green('Success!'));
You can find thousands of free packages at https://www.npmjs.com
3. EXPRESS.JS ESSENTIALS
3.1 What is Express.js?
- Express.js is a web framework built on top of Node.js.
- It helps you create web servers easily and fast.
- Without Express, you have to write a lot of code to handle routes and requests.
- With Express, it becomes super simple.
- Think of Express as a toolbox that gives you shortcuts to build web apps.
3.2 Setting Up Express Server
Step-by-Step:
- Create a new folder for your project
- Open terminal in that folder
- Run:
npm init -y
- Install Express:
npm install express
- Create a file
app.js and add this code:
const express = require('express');
const app = express();

app.get('/', (req, res) => {
  res.send("Hello from Express!");
});

app.listen(3000, () => {
  console.log("Server running on http://localhost:3000");
});
- Run the app:
node app.js
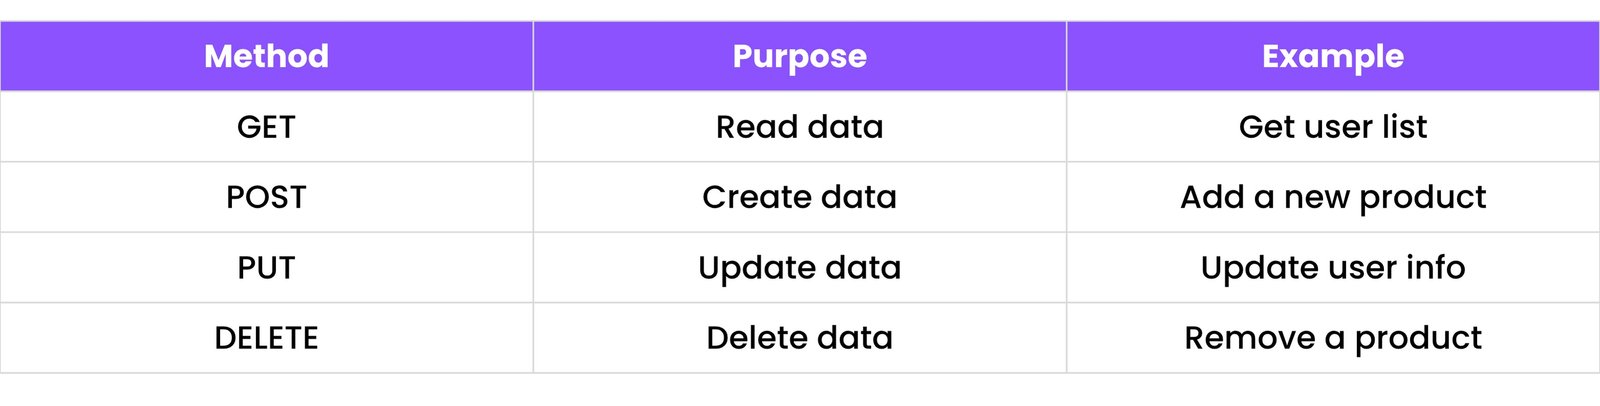
3.3 Routes (GET, POST, PUT, DELETE)
Routes are paths like /home, /about, etc.
Each route can respond to different HTTP methods:
Common ones:
- GET – Get data
- POST – Send new data
- PUT – Update data
- DELETE – Remove data
Example:
app.get('/hello', (req, res) => {
  res.send("Hello World");
});

app.post('/submit', (req, res) => {
  res.send("Data received");
});

app.put('/update', (req, res) => {
  res.send("Data updated");
});

app.delete('/delete', (req, res) => {
  res.send("Data deleted");
});
3.4 Handling Requests & Responses
req = request object (what the user sends)res = response object (what we send back)
Example:
app.get('/user/:id', (req, res) => {
  res.send("User ID: " + req.params.id);
});
You can also access query and body from the request:
app.get('/search', (req, res) => {
  const query = req.query.q;
  res.send(`You searched for: ${query}`);
});

app.post('/data', (req, res) => {
  // Make sure to use app.use(express.json()) to parse JSON data
  const receivedBody = req.body;
  res.send("Data received: " + JSON.stringify(receivedBody));
});
3.5 Using Middleware
Middleware is a function that runs before the request is processed.
It can:
- Log data
- Check authentication
- Parse JSON
Example:
app.use(express.json()); // This middleware parses JSON data from requests
You can also create your own middleware:
function logger(req, res, next) {
  console.log(`Request Method: ${req.method}, URL: ${req.url}`);
  next(); // Move to next middleware or route handler
}
app.use(logger);
3.6 Express Router
Routers help split your code into smaller files. Useful for big apps with many routes.
Example:
1. Create a file routes/user.js
const express = require('express');
const router = express.Router();

router.get('/', (req, res) => {
  res.send("User Home");
});

router.get('/profile', (req, res) => {
  res.send("User Profile");
});

module.exports = router;
2. In app.js, use the router:
const userRoutes = require('./routes/user');
app.use('/user', userRoutes);
Now, /user/ and /user/profile will work.
3.7 Serving Static Files
You can serve HTML, CSS, images using Express.
Step-by-Step:
- Create a folder
public
- Add files like
index.html, style.css, etc.
- Add this in
app.js:
app.use(express.static('public'));
Now if you go to http://localhost:3000/index.html, the file will open.
4. MONGODB & MONGOOSE
4.1 What is MongoDB?
- MongoDB is a NoSQL database used to store data in a flexible, easy-to-read format called documents.
- These documents are stored inside collections, similar to tables in SQL.
- Each document is written in JSON-like format, using key-value pairs:
{
  "name": "John Doe",
  "age": 30,
  "email": "john@example.com"
}
MongoDB is:
- Schema-less (you don’t need to define the structure of data in advance)
- Scalable (can handle large amounts of data)
- Flexible (you can add/remove fields anytime)
4.2 Connecting MongoDB with Mongoose
Mongoose is a Node.js library that makes working with MongoDB easier.
It helps you:
- Define schemas (structure for your data)
- Perform validations
- Run queries easily
Step-by-Step:
1. First, install Mongoose:
npm install mongoose
2. Then, connect to MongoDB:
const mongoose = require('mongoose');
mongoose.connect('mongodb://localhost:27017/mydb')
  .then(() => console.log('Connected to MongoDB!'))
  .catch(err => console.error('Could not connect to MongoDB:', err));
You can also use MongoDB Atlas for online databases (covered in 4.7).
4.3 Creating Schemas and Models
- A Schema is like a blueprint for your data (what fields it should have).
- A Model is like a tool to interact with the collection.
Example:
const mongoose = require('mongoose');
const userSchema = new mongoose.Schema({
  name: String,
  age: Number,
  isActive: Boolean
});
const User = mongoose.model('User', userSchema);
Now User can be used to create, read, update, delete users in MongoDB.
4.4 CRUD Operations
CRUD = Create, Read, Update, Delete
Create:
const newUser = new User({ name: "Jane Doe", age: 25, isActive: true });
newUser.save(); // Saves to database
Read:
User.find().then(users => console.log(users)); // Find all users
User.findOne({ name: "John" }).then(user => console.log(user)); // Find one
Update:
User.updateOne({ name: "John" }, { age: 31 }).then(res => console.log(res));
Delete:
User.deleteOne({ name: "Jane Doe" }).then(res => console.log(res));
4.5 Relationships in Mongoose
MongoDB is NoSQL, so it does not use "joins" like SQL, but we can create relationships using references.
Example:
Post Schema
const postSchema = new mongoose.Schema({
  title: String,
  content: String,
  author: {
    type: mongoose.Schema.Types.ObjectId,
    ref: 'User' // Reference to the User model
  }
});
Then, when getting posts, you can populate user data:
Post.find().populate('author').then(posts => console.log(posts));
4.6 Validations and Defaults
Schemas can have validations and default values.
Example:
const userSchema = new mongoose.Schema({
  name: { type: String, required: true },
  age: { type: Number, min: 18, max: 100 },
  createdAt: { type: Date, default: Date.now }
});
required: true – field must be presentmin and max – for number rangedefault – sets default value if nothing is given
4.7 MongoDB Atlas Setup
MongoDB Atlas is a cloud version of MongoDB – you can access it from anywhere.
Steps to use MongoDB Atlas:
- Go to: https://www.mongodb.com/cloud/atlas
- Create a free account
- Create a new project and a free cluster
- Add a database user (username and password)
- Whitelist your IP (0.0.0.0 for access from anywhere)
- Copy the connection string:
mongodb+srv://<username>:<password>@cluster0.abcde.mongodb.net/<dbname>?retryWrites=true&w=majority
- Use it in your Mongoose code:
mongoose.connect('YOUR_ATLAS_CONNECTION_STRING')
  .then(() => console.log('Connected to MongoDB Atlas!'))
  .catch(err => console.error(err));
5. REST APIS WITH EXPRESS & MONGODB
5.1 What is an API?
- API stands for Application Programming Interface.
- It allows two systems (like frontend and backend) to talk to each other.
- A REST API is a type of API that follows certain rules to handle data using standard HTTP methods:
Example:
- A mobile app sends a POST request to
/users to create a new user.
5.2 Creating RESTful Routes
Using Express.js, you can create RESTful API routes easily.
Example for a User model:
const express = require('express');
const router = express.Router();
const User = require('../models/User'); // Assuming User model is defined

// POST /users - Create a new user
router.post('/', async (req, res) => {
  const newUser = new User(req.body);
  await newUser.save();
  res.status(201).send(newUser);
});

// GET /users - Get all users
router.get('/', async (req, res) => {
  const users = await User.find();
  res.send(users);
});

// PUT /users/:id - Update a user by ID
router.put('/:id', async (req, res) => {
  const user = await User.findByIdAndUpdate(req.params.id, req.body, { new: true });
  res.send(user);
});

// DELETE /users/:id - Delete a user by ID
router.delete('/:id', async (req, res) => {
  await User.findByIdAndDelete(req.params.id);
  res.send({ message: "User deleted!" });
});

module.exports = router;
Then in app.js:
const userRoutes = require('./routes/user');
app.use('/users', userRoutes);
Now your API has:
POST /usersGET /usersPUT /users/:idDELETE /users/:id
5.3 Using Postman for Testing
Postman is a free tool to test APIs.
Steps to use Postman:
- Download it from https://www.postman.com
- Open Postman and create a new request
- Select method (GET, POST, etc.)
- Enter URL like:
http://localhost:3000/users
- If POST or PUT, go to Body > raw > JSON, and add data:
{
  "name": "John",
  "age": 30
}
- Click Send and see the response.
5.4 Connecting Routes to MongoDB
You need:
- MongoDB (or Atlas)
- Mongoose (installed via
npm install mongoose)
- A Model (like User)
Example Model:
const mongoose = require('mongoose');
const userSchema = new mongoose.Schema({
  name: String,
  age: Number
});
module.exports = mongoose.model('User', userSchema);
Your route files (like shown in 5.2) will use this model to store and fetch data.
5.5 Error Handling in APIs
Always handle errors to avoid crashing your server.
Example:
router.post('/', async (req, res) => {
  try {
    const newUser = new User(req.body);
    await newUser.save();
    res.status(201).send(newUser);
  } catch (error) {
    res.status(400).send({ error: error.message });
  }
});
You can use:
try...catch blocksres.status(code).send(message)- Custom error messages
5.6 Project Folder Structure
Here’s a simple structure for an Express + MongoDB REST API:
my-app/
├── models/
│   └── User.js       # Mongoose Schema
├── routes/
│   └── user.js       # All User-related routes
├── app.js            # Main entry file
└── package.json      # Project info and dependencies
Bonus Tip:
- You can add a
config folder to store the MongoDB URL and environment variables.
6. REACT BASICS
6.1 What is React?
- React is a JavaScript library used to build user interfaces (UI).
- It was created by Facebook and is now one of the most popular tools to build web apps.
- React is:
- Component-based – break UIs into small reusable pieces
- Fast and flexible – only updates the parts of the page that change
- Used in many real-world apps like Instagram, Facebook, Netflix
- React works with something called a Virtual DOM – a fast version of the webpage stored in memory that makes updates faster.
6.2 Setting Up React with Vite or Create React App
You can create a new React app using 2 popular tools:
- Create React App (CRA) – traditional setup
- Vite – faster, modern setup
Option 1: Using Create React App
npx create-react-app my-app
cd my-app
npm start
Option 2: Using Vite (recommended for speed)
npm create vite@latest my-vite-app -- --template react
cd my-vite-app
npm install
npm run dev
Then open browser at http://localhost:5173 (for Vite) or http://localhost:3000 (for CRA).
6.3 JSX Syntax
- JSX = JavaScript + XML
- In React, we write HTML inside JavaScript using JSX.
Example:
const element = <h1>Hello, React!</h1>;
Important JSX rules:
- Use
camelCase for HTML attributes (className instead of class)
- Return only one root element (wrap multiple elements in a
<div> or <></>)
Example with JS inside JSX:
const name = "Rudhra";
const element = <h1>Hello, {name}!</h1>;
6.4 Components (Functional and Class)
Component = small building block of UI
There are two types of components:
- Functional Component (Most Used)
function Welcome() {
  return <h1>Hello from Functional Component!</h1>;
}
- Class Component (Older Way)
import React, { Component } from 'react';
class Welcome extends Component {
  render() {
    return <h1>Hello from Class Component!</h1>;
  }
}
6.5 Props and State
Props (Short for Properties)
- Used to pass data from parent to child component
- Props are read-only
Call it like:
function Greet(props) {
  return <h1>Hello, {props.name}!</h1>;
}
// Usage: <Greet name="Rudhra" />
State
- Used to store and manage changing data inside a component
- Like a variable that React watches
import { useState } from 'react';
function Counter() {
  const [count, setCount] = useState(0);
  return (
    <div>
      <p>Count: {count}</p>
      <button onClick={() => setCount(count + 1)}>Add</button>
    </div>
  );
}
6.6 useState and useEffect Hooks
useState
- Adds state to a functional component
import { useState } from 'react';
const [value, setValue] = useState("initial");
useEffect
- Runs code when a component loads, updates, or unmounts
- Often used for API calls, timers, etc.
- “
[]” means it runs only once when the component mounts.
import { useEffect } from 'react';
useEffect(() => {
  console.log("Component loaded!");
}, []);
6.7 Conditional Rendering
React can show or hide elements based on conditions.
Example using if:
function Greeting(props) {
  if (props.isLoggedIn) {
    return <h1>Welcome back!</h1>;
  }
  return <h1>Please log in.</h1>;
}
Using ternary:
return <h1>{isLoggedIn ? "Welcome!" : "Login Please"}</h1>;
Using && (show only if true):
{isLoggedIn && <p>Welcome to your dashboard!</p>}
7. REACT ADVANCED CONCEPTS
7.1 Handling Forms and Inputs
React forms help collect user input like names, emails, or passwords.
Example of a simple form:
import { useState } from 'react';

function SimpleForm() {
  const [name, setName] = useState("");

  function handleSubmit(e) {
    e.preventDefault(); // Prevents page reload
    alert("Submitted: " + name); // Using alert here for simplicity, typically use custom modals
  }

  return (
    <form onSubmit={handleSubmit}>
      <input
        type="text"
        value={name}
        onChange={(e) => setName(e.target.value)}
        placeholder="Enter name"
      />
      <button type="submit">Submit</button>
    </form>
  );
}
Key Concepts:
value: tracks the input valueonChange: updates the value as user typesonSubmit: runs when the form is submitted
7.2 Lifting State Up
When two components need to share the same data, move the state to their common parent.
Example:
Parent component
import { useState } from 'react';
import InputBox from './InputBox';
import Display from './Display';

function Parent() {
  const [text, setText] = useState("");

  return (
    <div>
      <InputBox text={text} setText={setText} />
      <Display text={text} />
    </div>
  );
}
Child components
function InputBox({ text, setText }) {
  return <input value={text} onChange={(e) => setText(e.target.value)} />;
}

function Display({ text }) {
  return <p>You typed: {text}</p>;
}
This is called "lifting state up" because state lives in the parent and is passed down.
7.3 useContext for Global State
useContext helps avoid prop drilling (passing props through many layers).
Step-by-step:
1. Create a context file:
import { createContext } from 'react';
const AppContext = createContext(null); // Create context
export default AppContext;
2. Wrap your app with the provider:
<AppContext.Provider value={{ user: "Rudhra" }}>
  <MyComponent />
</AppContext.Provider>
3. Use the context in a child:
import { useContext } from 'react';
import AppContext from './AppContext';

function MyComponent() {
  const { user } = useContext(AppContext);
  return <h1>Hello, {user}!</h1>;
}
7.4 useRef and DOM Access
useRef is used to:
- Access DOM elements directly
- Store values that don’t trigger re-renders
Example 1: Accessing input field
import { useRef } from 'react';

function MyInput() {
  const inputRef = useRef(null);

  const handleClick = () => {
    inputRef.current.focus(); // Focus the input
  };

  return (
    <div>
      <input ref={inputRef} />
      <button onClick={handleClick}>Focus Input</button>
    </div>
  );
}
Example 2: Storing a value
const myValue = useRef(0); // myValue.current will be 0
7.5 useReducer
useReducer is like useState, but better for complex state logic.
Example: Counter with reducer
import { useReducer } from 'react';

function reducer(state, action) {
  switch (action.type) {
    case 'increment': return { count: state.count + 1 };
    case 'decrement': return { count: state.count - 1 };
    default: return state;
  }
}

function Counter() {
  const [state, dispatch] = useReducer(reducer, { count: 0 });

  return (
    <div>
      <p>Count: {state.count}</p>
      <button onClick={() => dispatch({ type: 'increment' })}>Add</button>
      <button onClick={() => dispatch({ type: 'decrement' })}>Subtract</button>
    </div>
  );
}
7.6 Custom Hooks
Custom hooks let you reuse logic across components.
Example: useTitle hook
import { useEffect } from 'react';

function useTitle(title) {
  useEffect(() => {
    document.title = title;
  }, [title]);
}
Use it in a component:
function About() {
  useTitle("About Page");
  return <h1>About Page</h1>;
}
7.7 React Router (v6) – Navigation & Routing
React Router helps you build Single-Page Applications (SPAs) with multiple views.
Step-by-Step Setup:
1. Install:
npm install react-router-dom@6
2. Basic Setup:
import { BrowserRouter, Routes, Route, Link } from 'react-router-dom';

function App() {
  return (
    <BrowserRouter>
      <nav>
        <Link to="/">Home</Link> | <Link to="/about">About</Link>
      </nav>
      <Routes>
        <Route path="/" element={<Home />} />
        <Route path="/about" element={<About />} />
      </Routes>
    </BrowserRouter>
  );
}

function Home() {
  return <h1>Home Page</h1>;
}

function About() {
  return <h1>About Page</h1>;
}
8. CONNECTING REACT TO EXPRESS API
8.1 Fetching Data with fetch() or Axios
React can connect to a backend (like Express) using two popular methods:
- Using
fetch() (built-in)
useEffect(() => {
  fetch('http://localhost:3000/users')
    .then(response => response.json())
    .then(data => console.log(data))
    .catch(error => console.error('Error:', error));
}, []);
- Using
Axios (more powerful)
1. First install Axios:
npm install axios
2. Then use it:
import axios from 'axios';
useEffect(() => {
  axios.get('http://localhost:3000/users')
    .then(response => console.log(response.data))
    .catch(error => console.error('Error:', error));
}, []);
8.2 Displaying API Data in Components
Once data is fetched, store it in state and use .map() to show it.
Example:
const [users, setUsers] = useState([]);

return (
  <div>
    <h2>User List</h2>
    <ul>
      {users.map(user => (
        <li key={user._id}>{user.name}</li>
      ))}
    </ul>
  </div>
);
Make sure each item has a key (like _id or index).
8.3 Submitting Form Data to Backend
To send data to your Express API, use POST.
Example using fetch:
const handleSubmit = async (e) => {
  e.preventDefault();
  await fetch('http://localhost:3000/users', {
    method: 'POST',
    headers: { 'Content-Type': 'application/json' },
    body: JSON.stringify({ name, email }),
  });
};
Example using Axios:
axios.post('http://localhost:3000/users', { name, email })
  .then(res => console.log(res.data))
  .catch(err => console.error(err));
8.4 Handling Loading and Errors
To show loading spinners or error messages:
const [isLoading, setIsLoading] = useState(true);
const [error, setError] = useState(null);

useEffect(() => {
  const fetchData = async () => {
    try {
      const response = await fetch('http://localhost:3000/users');
      if (!response.ok) {
        throw new Error('Something went wrong!');
      }
      const data = await response.json();
      setUsers(data);
    } catch (err) {
      setError(err.message);
    } finally {
      setIsLoading(false);
    }
  };
  fetchData();
}, []);
Render conditionally:
{isLoading ? <p>Loading...</p> : error ? <p>Error: {error}</p> : <UserList users={users} />}
8.5 CORS and Proxy Setup
By default, browsers block cross-origin requests.
If your frontend is on localhost:5173 and backend is on localhost:3000, you may see a CORS error.
Option 1: Fix in Express (recommended)
Install CORS in your Express backend:
npm install cors
Add this in your app.js:
const cors = require('cors');
app.use(cors()); // Allows all cross-origin requests
Option 2: Use Proxy in React (only in development)
In your React project’s package.json, add:
"proxy": "http://localhost:3000"
Now instead of:
fetch('http://localhost:3000/users')
You can just use:
fetch('/users')
9. AUTHENTICATION AND AUTHORIZATION
9.1 What is Authentication vs Authorization?
Let’s break it down simply:

Example:
- You log in to a website = ✅ Authentication
- You try to open the admin dashboard = ✅ Authorization check
9.2 Register & Login APIs
In Express, you can create two routes:
/register – to create a new user/login – to verify and allow access
Register Route (POST /register):
router.post('/register', async (req, res) => {
  // Hash password (see 9.3)
  const newUser = new User({ username: req.body.username, password: hashedPassword });
  await newUser.save();
  res.status(201).send("User registered!");
});
Login Route (POST /login):
router.post('/login', async (req, res) => {
  // Compare password (see 9.3)
  // If match, generate JWT (see 9.4)
  res.send({ token: 'YOUR_JWT_TOKEN' });
});
9.3 Password Hashing with bcrypt
- Hashing = converting the password into unreadable form
Steps:
npm install bcryptjs
- Use
bcrypt.hash(password, saltRounds) to encrypt
- Use
bcrypt.compare(plain, hashed) to check passwords
This keeps user passwords safe in the database.
9.4 JWT Token Generation and Verification
- JWT = JSON Web Token
- It’s like a digital ID card. Once a user logs in, you give them a token.
To generate a token:
const jwt = require('jsonwebtoken');
const token = jwt.sign({ id: user._id }, 'YOUR_SECRET_KEY', { expiresIn: '1h' });
To verify the token later:
jwt.verify(token, 'YOUR_SECRET_KEY', (err, decoded) => {
  if (err) return res.status(403).send("Invalid Token");
  req.userId = decoded.id; // Store user ID
});
JWT is sent with every protected request.
9.5 Protecting Routes in Express
To make a route private, use middleware to check the JWT token:
function verifyToken(req, res, next) {
  const token = req.header('Authorization');
  if (!token) return res.status(401).send("Access Denied");
  try {
    const verified = jwt.verify(token, 'YOUR_SECRET_KEY');
    req.user = verified;
    next();
  } catch (err) {
    res.status(400).send("Invalid Token");
  }
}
Use it on any route:
router.get('/dashboard', verifyToken, (req, res) => {
  res.send("Welcome to your dashboard, " + req.user.id);
});
9.6 Storing Tokens in Frontend (LocalStorage or Cookies)
After login, the frontend gets a token. Where do we keep it?
Option 1: LocalStorage
- Easy to use
- But vulnerable to XSS attacks (not good for sensitive apps)
localStorage.setItem('token', token);
const token = localStorage.getItem('token');
Option 2: Cookies (with httpOnly)
- Safer for production
- Requires backend to send cookies using
res.cookie()
// Backend:
res.cookie('token', token, { httpOnly: true });
// Frontend: Token is automatically sent with requests
9.7 Protecting Routes in React
Once user logs in, you can show/hide components or pages based on the token.
Simple example:
ProtectedRoute Component:
import React from 'react';
import { Navigate } from 'react-router-dom';

const ProtectedRoute = ({ children }) => {
  const isAuthenticated = localStorage.getItem('token'); // Or check context
  if (!isAuthenticated) {
    return <Navigate to="/login" replace />;
  }
  return children;
};
Use it in routes:
<Route path="/dashboard" element={<ProtectedRoute><Dashboard /></ProtectedRoute>} />
10. PROJECT DEPLOYMENT (FULL MERN APP)
10.1 Preparing Backend for Deployment
Before deploying the backend (Express + MongoDB):
Steps:
- Remove hardcoded URLs – use environment variables
- Use production-ready database (like MongoDB Atlas)
- Enable CORS properly
const cors = require('cors');
app.use(cors({ origin: 'https://your-frontend-domain.com' }));
- Update
package.json
Add this script:
"scripts": {
  "start": "node app.js",
  "dev": "nodemon app.js"
}
- Add
.env file:
PORT=5000
MONGO_URI=your_atlas_connection_string
JWT_SECRET=your_jwt_secret
10.2 Preparing React Frontend for Build
To deploy your React app:
Steps:
- Open terminal in your React project folder
- Run:
npm run build
- A new folder called
build/ will be created. It contains the final static files.
10.3 Connecting Frontend and Backend
You have two options:
Option 1: Same server
- Serve React build from Express backend
const path = require('path');
app.use(express.static(path.join(__dirname, 'client/build'))); // Assuming React build is in a 'client/build' folder
app.get('*', (req, res) => {
  res.sendFile(path.resolve(__dirname, 'client/build', 'index.html'));
});
Option 2: Deploy separately
- Frontend on Vercel/Netlify
- Backend on Render/Railway
- Connect using full URLs (
https://your-api-domain.com/api/users)
- Make sure your backend supports CORS.
10.4 Deploying with Render / Vercel / Railway
Deploy Backend on Render
- Go to https://render.com
- Connect your GitHub repo
- Choose Web Service
- Set build and start commands:
Build Command: npm install
Start Command: node app.js
- Add environment variables under "Environment"
Deploy Frontend on Vercel
- Go to https://vercel.com
- Connect GitHub repo
- Select root folder of frontend (if in
/client)
- Vercel will auto-detect React and deploy it
Railway is similar to Render but more developer-friendly
10.5 Environment Variables in Production
For Express:
- Use
.env file and dotenv package:
require('dotenv').config();
const PORT = process.env.PORT || 3000;
For React:
REACT_APP_API_URL=https://your-backend-api.com
Access it in React:
console.log(process.env.REACT_APP_API_URL);
You must rebuild React if you change .env.
10.6 Domain & Hosting Suggestions
Free Hosting Options:
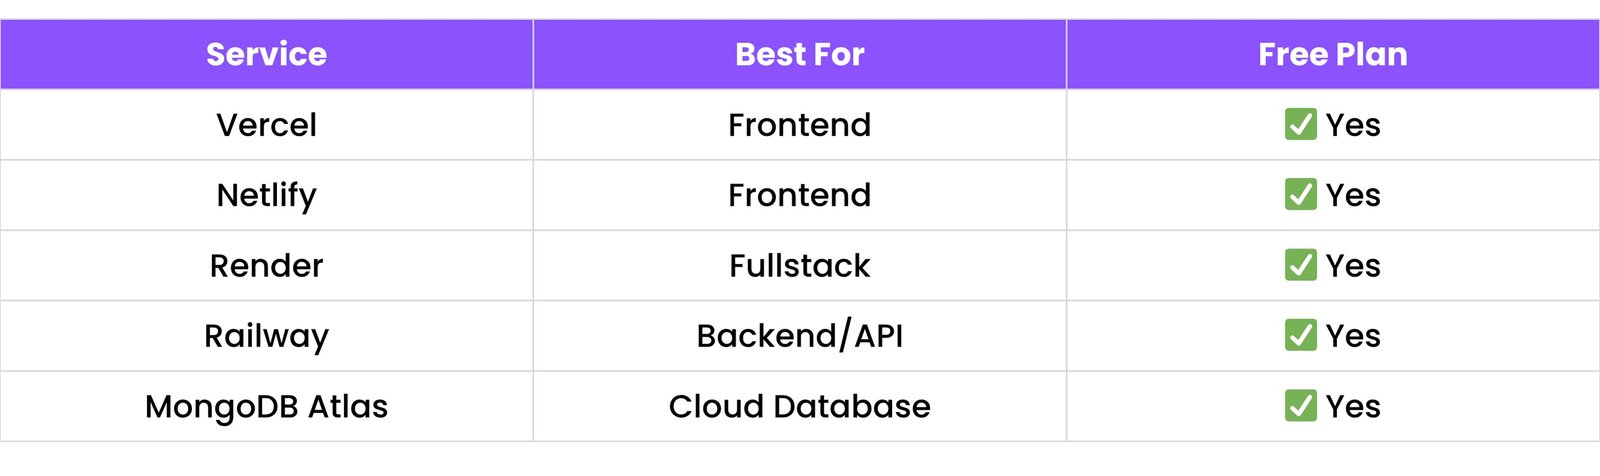
Custom Domain (Optional)
- Buy from: GoDaddy, Namecheap
- Connect domain to Vercel/Render in settings
- Use DNS records (A/CNAME) to point your domain
11. BONUS TIPS (FOR MERN STACK BEGINNERS)
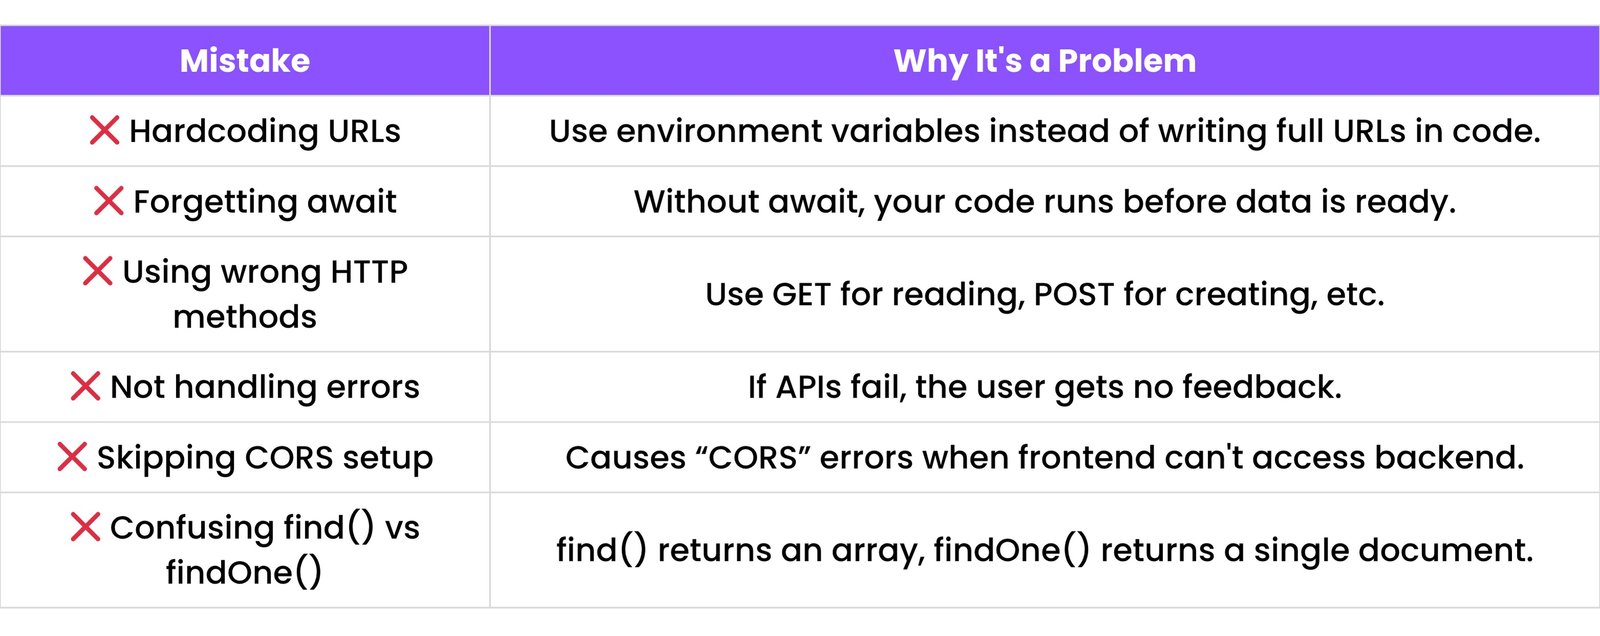
11.1 Common Beginner Mistakes in MERN
11.2 Folder Structure Best Practices
A clean structure helps you find files quickly and work in teams easily.
Recommended MERN Folder Layout:
your-mern-app/
├── backend/
│   ├── models/
│   │   └── User.js
│   ├── routes/
│   │   └── auth.js
│   │   └── user.js
│   ├── config/
│   │   └── db.js
│   ├── middleware/
│   │   └── authMiddleware.js
│   ├── server.js
│   └── package.json
├── frontend/
│   ├── public/
│   ├── src/
│   │   ├── components/
│   │   ├── pages/
│   │   ├── services/
│   │   ├── context/
│   │   ├── App.js
│   │   └── index.js
│   └── package.json
├── .gitignore
├── README.md
11.3 Using Postman Collections
Postman is not just for testing; you can save and organize requests in Collections.
Why use Postman Collections?
- Group all endpoints (like User APIs, Product APIs)
- Save headers, tokens, and request bodies
- Share collection with team or students
Steps:
- In Postman, create a Collection
- Add each API request inside it
- Export the collection (
.json file) to reuse/share
11.4 Debugging Tips
Every developer faces bugs — here’s how to fix them easily:
Frontend (React) Debugging:
- Use
console.log() to check values
- Use browser DevTools > Network tab to check API errors
- Check
.env variables and restart after changes
Backend (Express) Debugging:
- Use
console.log() to inspect request data
- Add error-handling middleware
- Use tools like Postman to isolate backend problems
General Tip:
- If something doesn’t work: check file paths, ports, and CORS. 80% of errors are here.
11.5 Resources to Learn More
Documentation:
YouTube Channels:
- Code with Harry (Hindi + English mix)
- Traversy Media
- The Net Ninja
- freeCodeCamp
- Anuj Bhaiya (Hindi MERN content)
Blogs and Courses:
- GeeksforGeeks.org
- JavaScript.info
- Udemy MERN Stack Courses (Search for “MERN Stack Bootcamp”)
- MDN Web Docs