1. INTRODUCTION TO MONGODB
1.1 What is MongoDB?
MongoDB is a database. A database is where we store data like names, emails, passwords, and messages.
But MongoDB is different from other databases because it stores data like a real-world object using something called a document.
A document is like a small file that looks like this:
{
  "name": "Anjali",
  "age": 22,
  "email": "anjali@example.com"
}
This is how MongoDB saves data. It uses key-value pairs, just like in JavaScript objects.
Each document goes inside a collection, and many collections make up a database.
1.2 Features of MongoDB
Here are some easy-to-understand features:
- NoSQL Database - It doesn't use tables like traditional databases (such as MySQL). It uses collections and documents.
- Stores Data as JSON-like Documents - Easy to read and understand.
- Flexible Structure - You don't need to define a strict format before saving data.
- Scalable - It works well for both small and very large applications.
- Fast Performance - It can handle lots of data quickly.
- Open Source - Free to use.
1.3 MongoDB vs SQL Databases
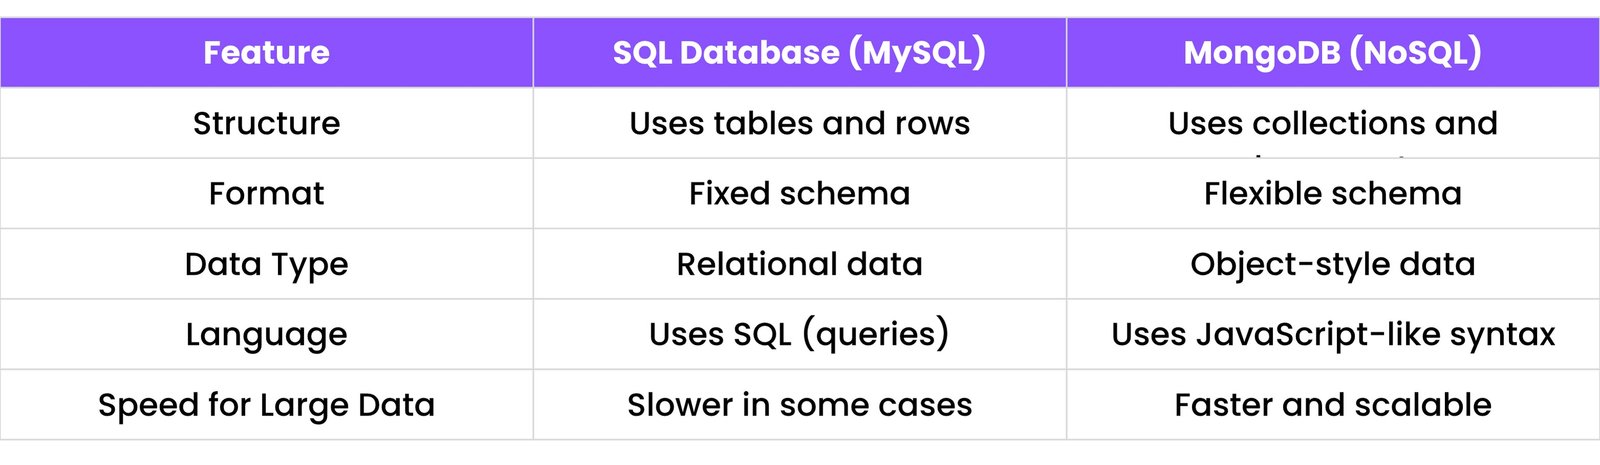
MongoDB is not better or worse; it's just different and often easier to use for modern web apps and beginners.
1.4 Why Choose MongoDB?
- It's easy to use with JavaScript and Node.js.
- You don't need to know complex SQL queries.
- You can start building apps faster.
- It's used by many companies, so learning it is useful.
- Works great with real-time data and big data.
1.5 Where is MongoDB Used?
MongoDB is used in many types of apps:
- Social Media Apps (like messaging)
- E-commerce Stores (for product listings)
- Blogs and CMS (like WordPress-style apps)
- Chat Applications
- Inventory Management Systems
- Real-time dashboards
2. INSTALLATION & SETUP
2.1 Installing MongoDB Locally (Windows, macOS, Linux)
To use MongoDB on your computer, you can download and install it:
Steps:
- Go to: https://www.mongodb.com/try/download/community.
- Choose your OS: Windows/macOS/Linux
- Download the installer
- Install it with default settings
After installing:
- On Windows: Use Command Prompt
- On macOS/Linux: Use Terminal
To check if it's working:
mongod --version
2.2 Setting Up MongoDB Compass (GUI Tool)
MongoDB Compass is a visual tool that helps you see data easily without typing commands.
Steps:
- Go to: https://www.mongodb.com/products/compass
- Download Compass for your OS
- Install and open it
With Compass, you can:
- Create databases
- See collections
- Add or edit documents
- Run queries
2.3 Using MongoDB Atlas (Cloud Version)
MongoDB Atlas is a cloud version of MongoDB—it works online. You don't need to install anything.
Benefits:
- Works from anywhere
- Easy to share access
- Free tier available
2.4 Creating a Free Cluster on MongoDB Atlas
A cluster is like your online database home.
Steps:
- Go to: https://www.mongodb.com/cloud/atlas
- Sign up for a free account
- Create a new project
- Click "Build a Database"
- Choose Free Shared Cluster
- Choose a region (like AWS Mumbai)
- Name your cluster (like myCluster)
- Wait 1-2 minutes for it to set up
2.5 Getting Your Connection String
Once your cluster is ready:
- Go to Database > Connect
- Choose "Connect your application"
- Copy the connection string (starts with
mongodb+srv://)
- You'll use this string in your Node.js code to connect
Example:
mongodb+srv://username:password@cluster.mongodb.net/myDatabase
Replace username, password, and myDatabase with your actual details.
3. MONGODB BASICS
3.1 Understanding Databases, Collections, and Documents
Think of MongoDB like a school:
- Database = The whole school (Example:
schoolDB)
- Collection = A classroom (Example:
students)
- Document = A student file (Example: data of one student)
So MongoDB stores data like this:
schoolDB
- students (collection)
  { "name": "Ravi", "age": 20}
  { "name": "Priya", "age": 22}
3.2 What is BSON and JSON?
- JSON means JavaScript Object Notation - a format for storing data.
- BSON means Binary JSON - MongoDB stores data in this format (it's faster).
- But don't worry - you write data in JSON, and MongoDB handles the rest.
Example of JSON:
{
  "name": "Aman",
  "age": 25
}
3.3 MongoDB Data Types
Here are some common data types in MongoDB:
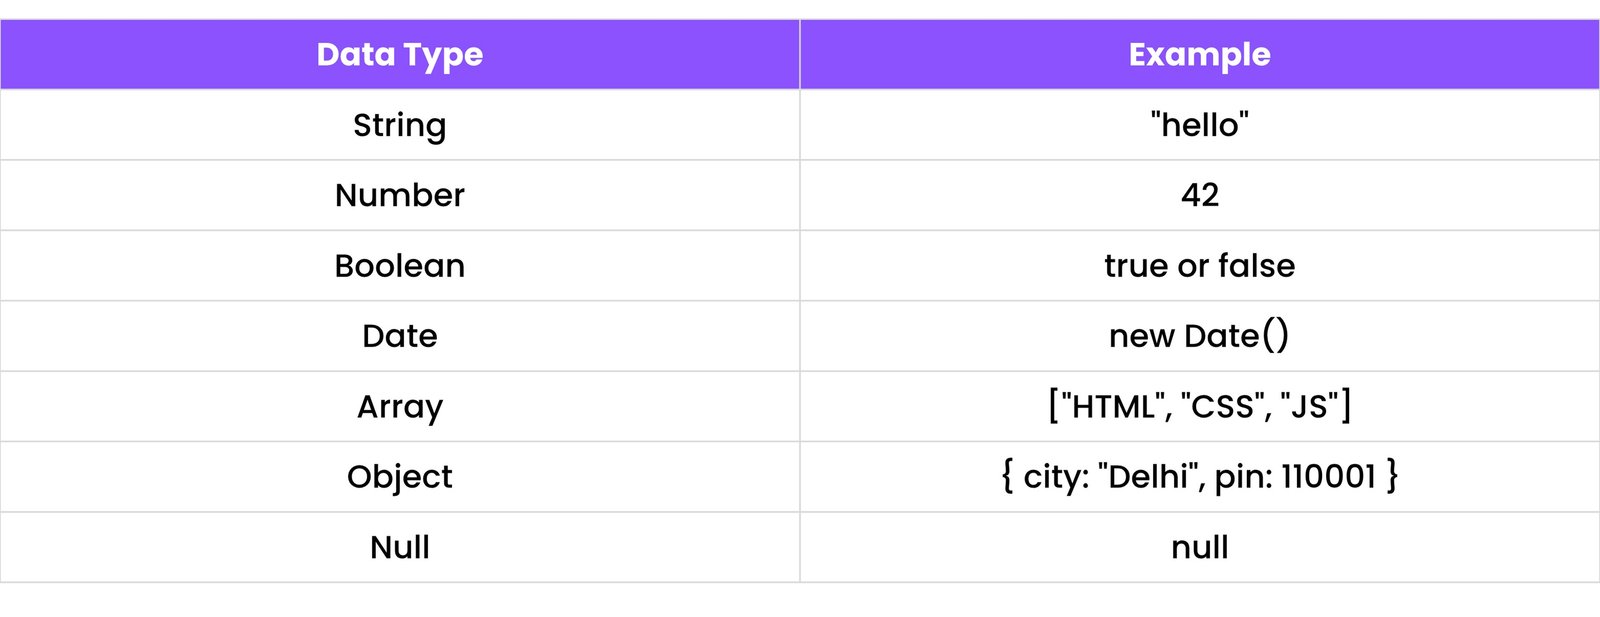
You use these types to describe what kind of data you're saving.
3.4 Creating and Viewing Databases
In the shell (mongosh):
use myDatabase
This creates or switches to myDatabase.
To see all databases:
show dbs
To show the current database:
db
3.5 Creating and Viewing Collections
To create a collection:
db.createCollection("students")
To see collections:
show collections
3.6 Inserting a Document (insertOne, insertMany)
insertOne – add one document:
db.students.insertOne({
  name: "Ravi",
  age: 20,
  course: "JavaScript"
})
insertMany – add multiple documents:
db.students.insertMany([
  { name: "Priya", age: 22 },
  { name: "Aditi", age: 19 }
])
4. CRUD OPERATIONS IN MONGODB
CRUD = Create, Read, Update, Delete. These are the 4 basic things we do with data.
4.1 Create – insertOne, insertMany
(Already shown above in section 3.6)
4.2 Read – find, findOne
findOne() – shows the first document it finds:
db.students.findOne()
find() – shows all documents in the collection:
db.students.find()
With a filter:
db.students.find({ age: 20 })
4.3 Update – updateOne, updateMany, replaceOne
updateOne() – update the first match:
db.students.updateOne(
  { name: "Ravi" },
  { $set: { age: 21 } }
)
updateMany() – update all matches:
db.students.updateMany(
  { course: "JavaScript" },
  { $set: { course: "JS" } }
)
replaceOne() – replace the full document:
db.students.replaceOne(
  { name: "Priya" },
  { name: "Priya", age: 24, city: "Delhi" }
)
4.4 Delete – deleteOne, deleteMany
deleteOne() – deletes the first match:
db.students.deleteOne({ name: "Ravi" })
deleteMany() – deletes all matching documents:
db.students.deleteMany({ age: { $gt: 20 } })
4.5 Using Filters and Conditions
Use filters to get specific data:
// Find students with age greater than 18
db.students.find({ age: { $gt: 18 } })

// Find students with age > 20 OR city is Delhi
db.students.find({ $or: [{ age: { $gt: 20 } }, { city: "Delhi" }] })
4.6 Sorting and Limiting Results
Sorting:
db.students.find().sort({ age: 1 })  // Ascending
db.students.find().sort({ age: -1 }) // Descending
Limiting:
db.students.find().limit(2) // Only return 2 documents
4.7 Projecting Specific Fields
You can show only selected fields using projection:
db.students.find({}, { name: 1, age: 1, _id: 0 })
This shows only name and age, and hides other fields (_id is hidden with 0).
5. MONGODB SHELL & COMMANDS
5.1 Accessing the Shell (mongosh)
The MongoDB shell is where you type commands to talk to MongoDB.
After installing MongoDB, open Terminal or Command Prompt and type:
mongosh
This opens the MongoDB shell. Now you can type commands like show dbs, use, or db.collection.find() to work with your data.
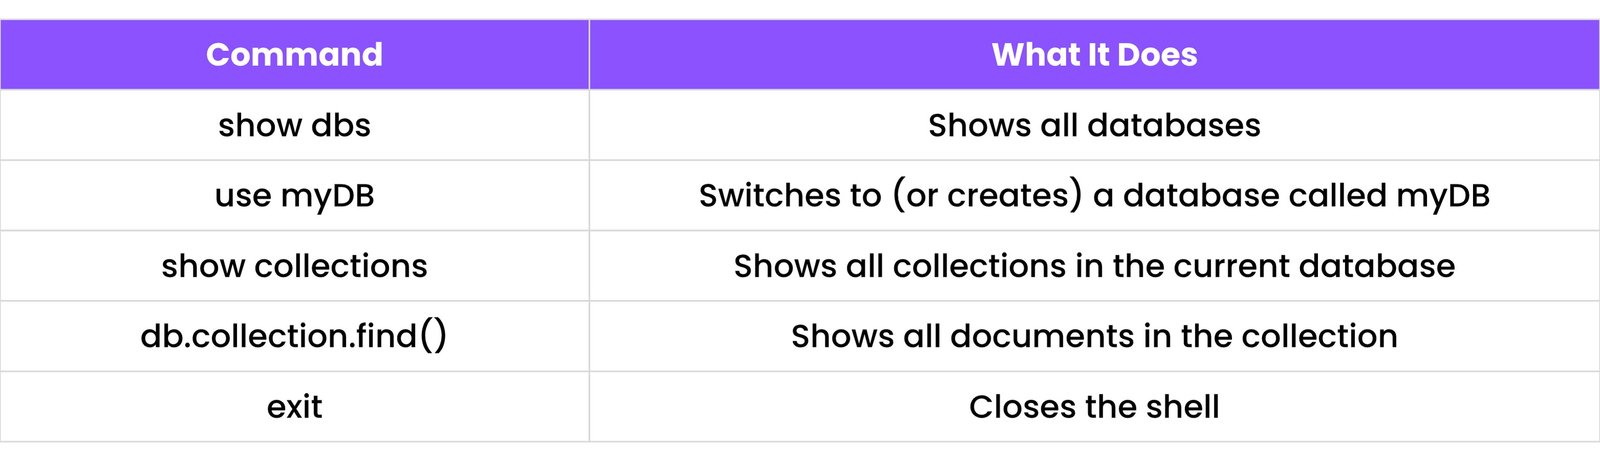
5.2 Basic Shell Commands
Here are some important commands you’ll use often:
5.3 Switching Databases
To switch to another database:
use blog
If blog exists, it switches. If it doesn’t, MongoDB creates it when you add data.
5.4 Dropping Collections and Databases
To delete (drop) a collection:
db.students.drop()
To delete (drop) a database:
db.dropDatabase()
Be careful: Once dropped, data is gone forever.
5.5 Working with ObjectId
MongoDB gives every document a special _id called ObjectId.
It looks like this:
ObjectId("649fa17b115d67011234567890abcdef1234")
This is like a unique ID for each document.
You can search by ID like this:
db.students.findOne({ _id: ObjectId("649fa17b115d67011234567890abcdef1234") })
Make sure you wrap the ID with ObjectId() — not just quotes.
6. QUERY OPERATORS
Operators help us filter and change data. Think of them like "tools" inside MongoDB.
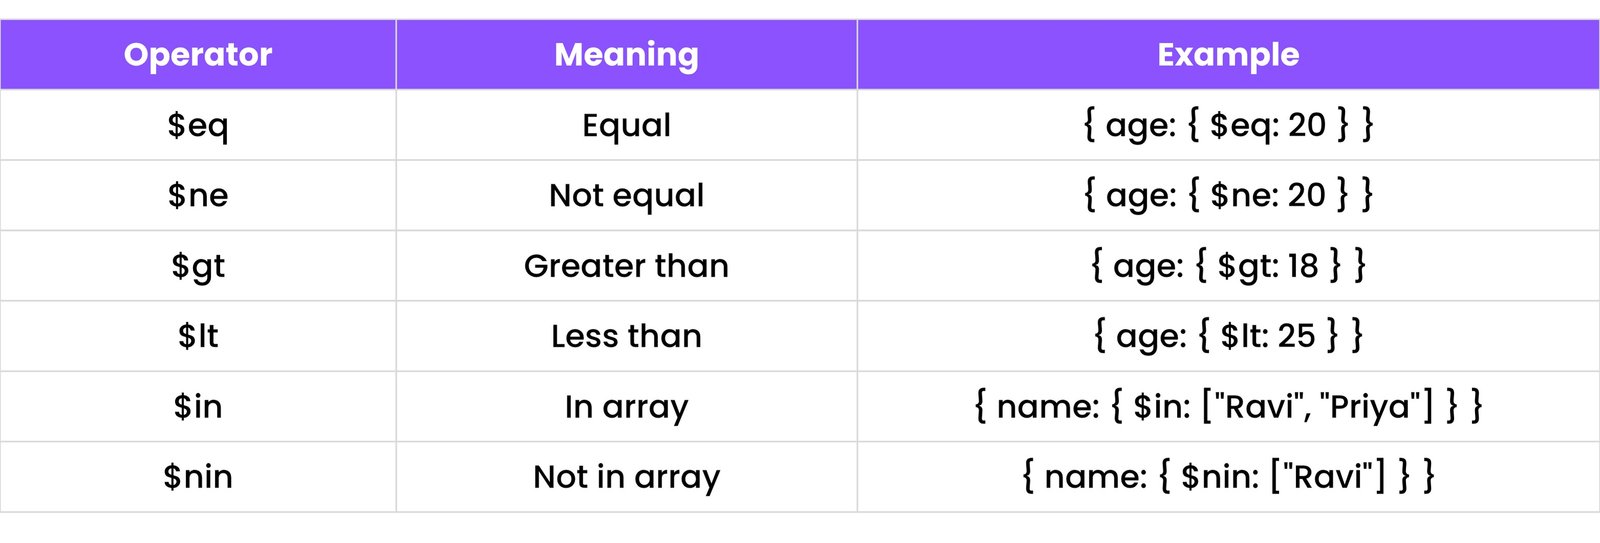
6.1 Comparison Operators
These are used to compare values.
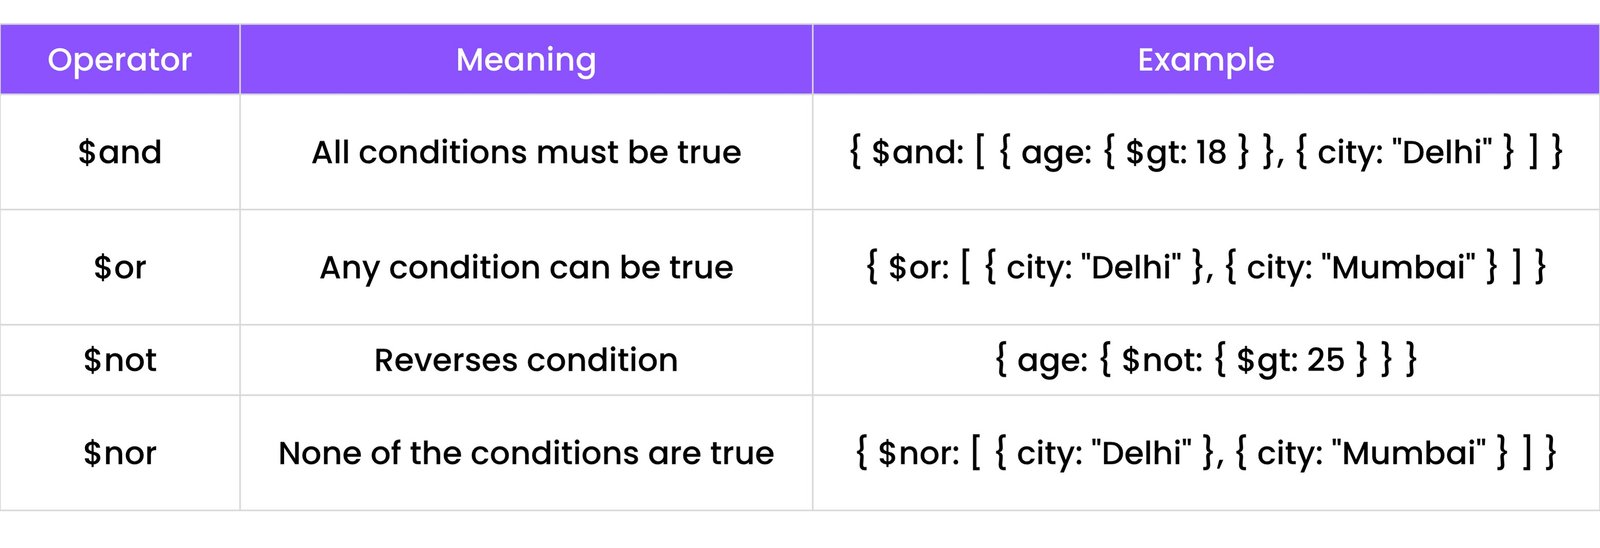
6.2 Logical Operators
These combine multiple conditions.
6.3 Element Operators
Used to check if a field exists or its type.

6.4 Evaluation Operators
Used to check patterns or expressions.

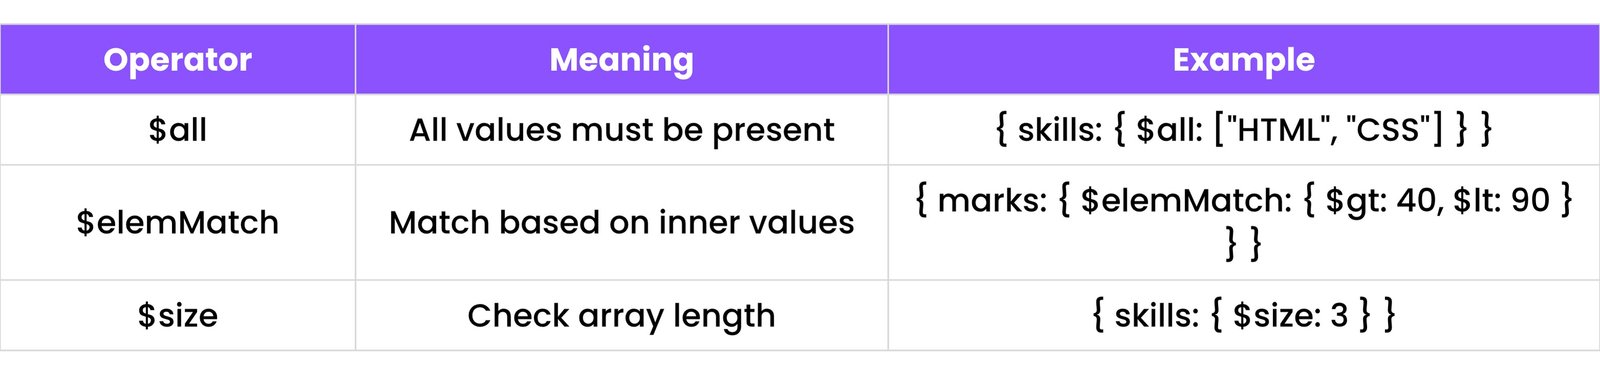
6.5 Array Operators
Used with array fields.
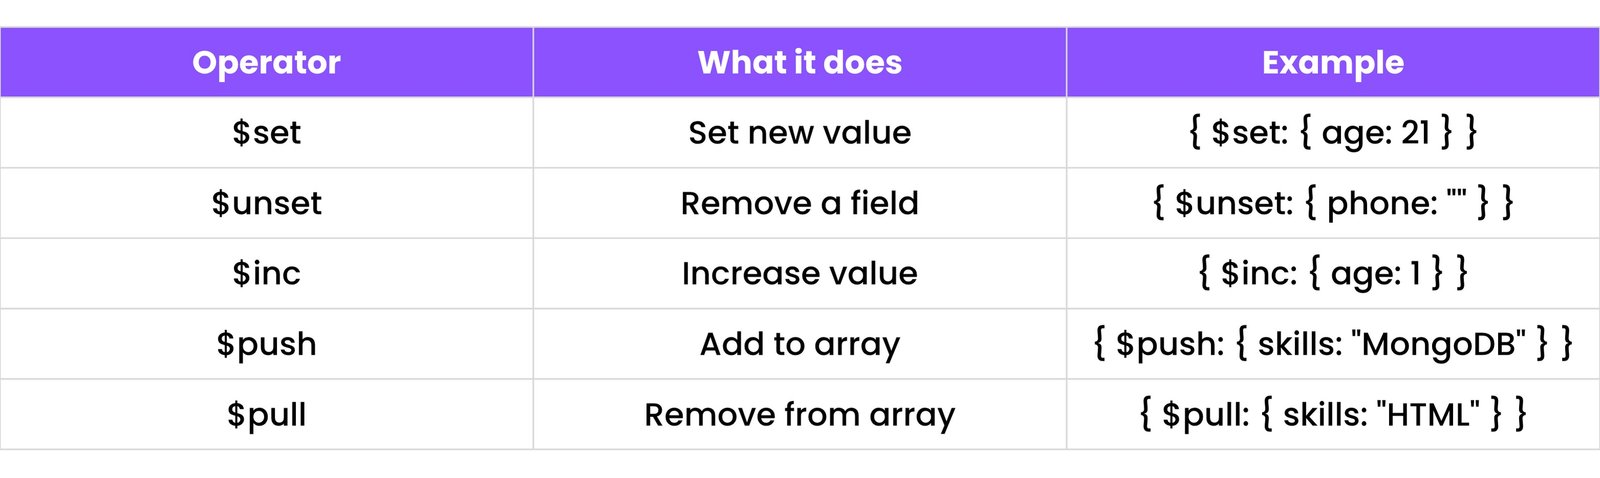
6.6 Update Operators
Used inside updateOne() and updateMany().
7. DATA MODELING IN MONGODB
Data modeling means organizing your data in the best way before saving it in the database. You choose how data is stored, connected, and accessed.
7.1 Embedded Documents (Nested Objects)
Embedded means storing one document inside another. It’s like putting a small box inside a big box.
Example:
{
  "name": "Ravi",
  "email": "ravi@example.com",
  "address": {
    "city": "Ahmedabad",
    "pincode": "380001"
  }
}
Here, the address is an embedded document. It's part of the main document and saved together.
When to Use:
- When the related data is always used together
- When the data is small and simple
Example Use Cases:
- User profile with address
- Blog post with comments
7.2 Referenced Documents (Relations using _id)
Sometimes, you want to connect two documents using a reference. This is called referencing.
Example:
// users collection
{ "_id": "u123", "name": "Priya" }

// orders collection
{ "product": "Laptop", "userId": "u123" }
Here, the order document refers to a user by their _id. This is useful when you have:
- Big data
- Repeated information
- Multiple connections
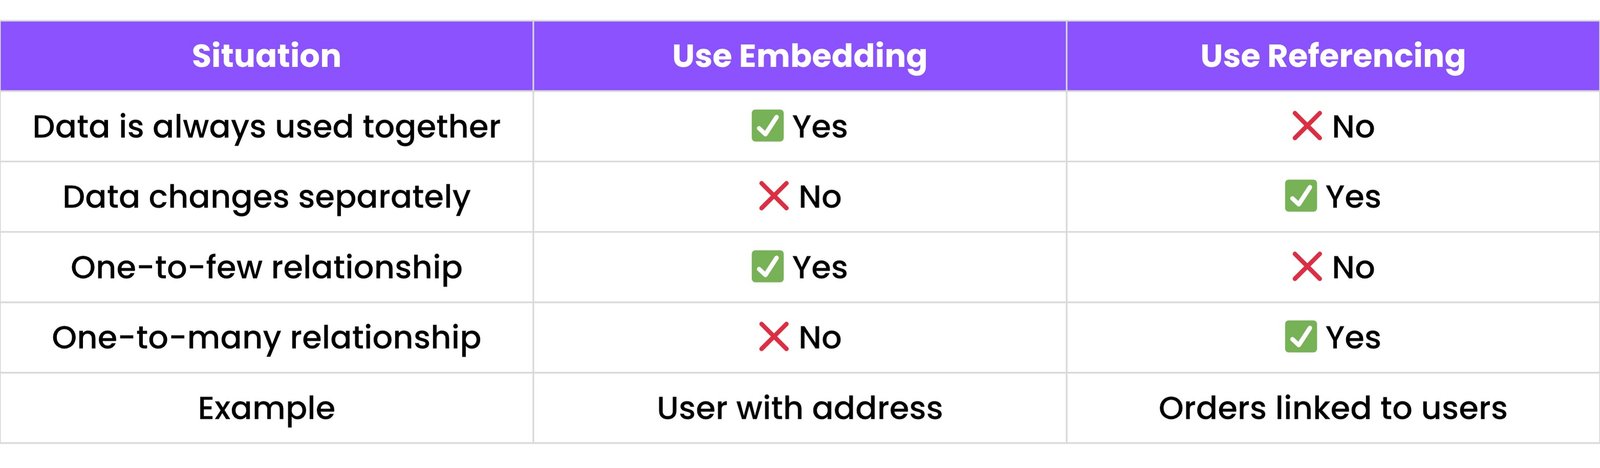
7.3 Choosing Between Embedding vs Referencing
Simple Rule:
- Use embedding for small, simple data.
- Use referencing for large, repeated, or shared data.
7.4 Schema Design Best Practices (Flat vs Deep Structures)
MongoDB allows flexible schemas, but designing them wisely is important.
Flat Structure
A flat schema has fewer levels. It's easier to read and faster to query.
{
  "name": "Ankit",
  "email": "ankit@example.com",
  "city": "Surat"
}
Deep Structure
A deep schema has many nested objects.
{
  "user": {
    "profile": {
      "name": "Ankit"
    },
    "contact": {
      "email": "ankit@example.com"
    }
  }
}
8. INDEXES IN MONGODB
8.1 What is an Index?
An index in MongoDB is like a shortcut for finding data faster. Think of a book:
- Without an index: You flip page by page to find a topic.
- With an index: You go to the exact page directly.
MongoDB does the same with data.
Without an index, MongoDB checks every document (called a collection scan).
With an index, it finds the data quickly, just like using a table of contents.
8.2 Creating Indexes
To create an index in the MongoDB shell:
db.students.createIndex({ name: 1 })
Here, students is the collection name, name is the field to index, and 1 means ascending order.
You can also use -1 for descending order:
db.students.createIndex({ name: -1 })
8.3 Types of Indexes
a) Single Field Index
Index on just one field.
Example:
db.products.createIndex({ price: 1 })
b) Compound Index
Index on two or more fields.
Example:
db.users.createIndex({ name: 1, age: -1 })
Searches using both fields will be faster.
c) Text Index
Helps search for words (like a search engine).
db.posts.createIndex({ title: "text", description: "text" })
Then you can search like this:
db.posts.find({ $text: { $search: "MongoDB" } })
d) Unique Index
Makes sure all values are different.
Useful for fields like email, username, etc.
db.users.createIndex({ email: 1 }, { unique: true })
If you try to insert a document with the same email again, it will fail.
8.4 Why Indexes Improve Performance
- Without index: MongoDB looks through every document = slow.
- With index: MongoDB jumps directly to the right document = fast.
Example: Imagine searching for a user with age 25 in 1,00,000 records. With an index on age, MongoDB finds the result much faster.
Indexes are very useful when:
- You search/filter often on the same field
- You sort or limit large data
- You need fast performance
8.5 Viewing and Dropping Indexes
To see all indexes in a collection:
db.students.getIndexes()
To drop (delete) an index:
db.students.dropIndex("name_1")
"name_1" is the index name (check it with getIndexes()).
To drop all indexes:
db.students.dropIndexes()
Be careful: Dropping indexes may slow down your queries.
9. AGGREGATION FRAMEWORK IN MONGODB
Aggregation means taking data and doing something with it — like grouping, counting, filtering, or changing its shape.
You use aggregation to:
- Summarize data
- Calculate totals or averages
- Transform documents into a new form
MongoDB provides a powerful tool called the Aggregation Pipeline.
Think of it like a step-by-step filter system where data passes through multiple stages, and each stage changes or filters it.
9.1 What is Aggregation?
(Content covered in section introduction)
9.2 Pipeline Stages
In MongoDB, aggregation is done using a pipeline. A pipeline is a list of stages, and each stage does something.
Here are the most common stages:

You write aggregation like this:
db.students.aggregate([
  { $match: { course: "JavaScript" } },
  { $group: { _id: "$course", total: { $sum: 1 } } }
])
9.3 Using $group to Summarize Data
The $group stage helps you combine documents into groups.
For example: Count how many students are in each course.
db.students.aggregate([
  { $group: {
      _id: "$course", // group by course
      totalStudents: { $sum: 1 }
  }}
])
This gives you a result like:
[
  { "_id": "JavaScript", "totalStudents": 3 },
  { "_id": "Python", "totalStudents": 2 }
]
You can also use other operators:
$avg for average$sum for total$min and $max for smallest and largest
9.4 Simple Examples with $match and $project
Example 1: Using $match (like a filter)
db.students.aggregate([
  { $match: { age: { $gt: 20 } } }
])
This shows all students with age > 20.
Example 2: Using $project (select fields)
db.students.aggregate([
  { $project: {
      name: 1,
      age: 1,
      _id: 0
  }}
])
This shows only the name and age of each student and hides the _id.
Example 3: Combine $match, $project, and $sort
db.students.aggregate([
  { $match: { course: "Python" } },
  { $project: { name: 1, age: 1, _id: 0 } },
  { $sort: { age: -1 } }
])
This:
- Filters students in the Python course
- Shows name and age only
- Sorts them by age in descending order
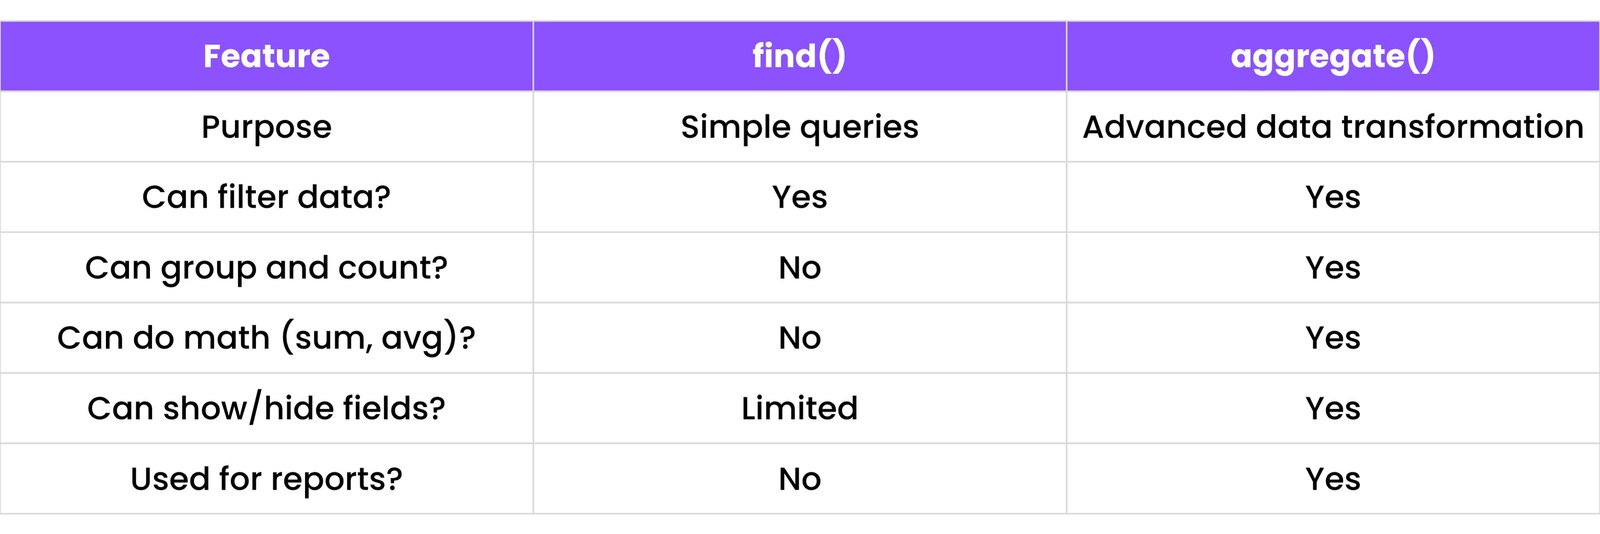
9.5 Aggregation vs find() Queries
In Simple Words:
- Use
find() when you just need to get data.
- Use
aggregate() when you need to analyze, group, or transform the data.
10. MONGOOSE WITH NODE.JS
10.1 What is Mongoose?
Mongoose is a tool that helps Node.js apps talk to MongoDB easily.
MongoDB lets you save anything, but Mongoose gives your data a structure so you can:
- Organize it
- Validate it
- Control how it looks
Mongoose acts like a translator between your Node.js code and your MongoDB database.
10.2 Installing Mongoose
To use Mongoose, first make sure you have:
- Node.js installed
- A MongoDB connection (local or Atlas)
To install Mongoose:
In your terminal, run:
npm install mongoose
This will download and add Mongoose to your project.
10.3 Connecting to MongoDB with Mongoose
Inside your app.js or index.js, write this:
const mongoose = require("mongoose");
mongoose.connect("mongodb://127.0.0.1:27017/myDatabase")
  .then(() => console.log("MongoDB connected!"))
  .catch(err => console.error("Connection failed!", err));
If using MongoDB Atlas, replace the URL with your connection string (from 2.5):
mongoose.connect("mongodb+srv://username:password@cluster.mongodb.net/myDatabase")
10.4 Creating Schemas
A schema defines what your data should look like.
Example: A student should have a name and an age.
const studentSchema = new mongoose.Schema({
  name: String,
  age: Number
});
You are telling MongoDB: "Each student must have a name and an age."
10.5 Creating Models
After you make a schema, you create a model.
A model connects the schema with a MongoDB collection.
const Student = mongoose.model("Student", studentSchema);
Now Student is like a class — you can create, find, update, or delete students using it.
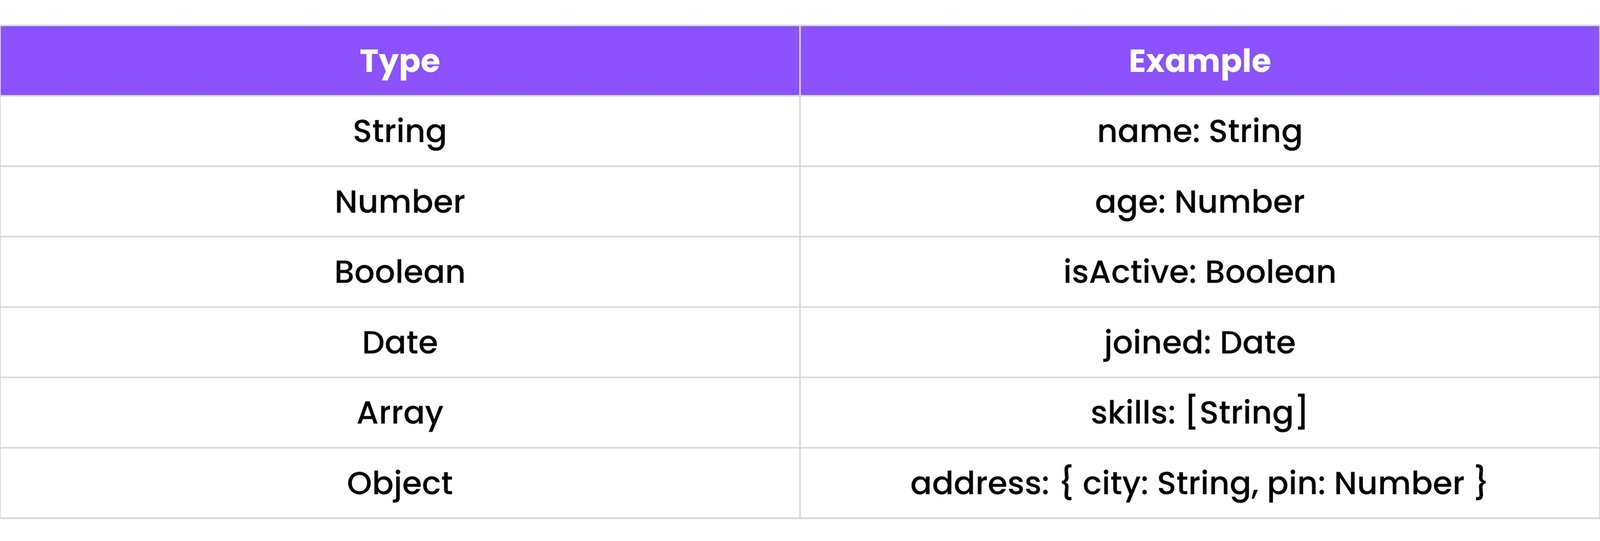
10.6 Data Types in Mongoose Schema
These types help Mongoose know what kind of data to expect.
10.7 Saving, Finding, Updating, Deleting Data
Let’s see how to do basic tasks using Mongoose.
a) Saving a New Document
const newStudent = new Student({
  name: "Ravi",
  age: 20
});
newStudent.save()
  .then(() => console.log("Student saved!"))
  .catch(err => console.error("Error!", err));
b) Finding Documents
Student.find().then(data => console.log(data));
Find with a filter:
Student.find({ age: 22 })
c) Updating a Document
Student.updateOne(
  { name: "Ravi" },
  { $set: { age: 21 } }
);
Or use findOneAndUpdate:
Student.findOneAndUpdate(
  { name: "Ravi" },
  { age: 22 },
  { new: true } // Returns the updated document
);
d) Deleting a Document
Student.deleteOne({ name: "Ravi" });
Or delete many:
Student.deleteMany({ age: 24 });
11. SCHEMA VALIDATIONS & DEFAULTS
In Mongoose, you can control what kind of data is allowed in your database. You can: make fields required, set default values, validate field types, add your own custom rules, and track createdAt and updatedAt times. Let’s break it down.
11.1 Required Fields
You can make a field required, meaning the user must provide a value. If not, it gives an error.
Example:
const userSchema = new mongoose.Schema({
  name: {
    type: String,
    required: true
  }
});
If someone tries to save a document without a name, Mongoose will not allow it.
11.2 Setting Default Values
A default value is what gets saved when the user does not provide anything.
Example:
const userSchema = new mongoose.Schema({
  isActive: {
    type: Boolean,
    default: true
  }
});
Now, if no isActive value is given, it will automatically be true.
11.3 Field Type Validations
You can check if a value is the correct type, like:
- String must be text
- Number must be a number
You can also add extra rules like:
- Minimum or maximum length for strings
- Minimum or maximum value for numbers
Example:
const userSchema = new mongoose.Schema({
  name: { type: String, minlength: 3 },
  age: { type: Number, min: 5, max: 100 }
});
Now:
name must be at least 3 letters longage must be between 5 and 100
11.4 Custom Validations (Simple Examples)
You can also write your own custom rules using the validate option.
Example: Email must contain "@"
const userSchema = new mongoose.Schema({
  email: {
    type: String,
    validate: {
      validator: function(v) {
        return v.includes("@");
      },
      message: props => `${props.value} is not a valid email! Email must contain @`
    }
  }
});
If someone tries to save an email like "abc.com", it will show: "Email must contain @"
11.5 Using Timestamps
Mongoose can automatically add time info — when a document is created and last updated.
Just add this to your schema:
const blogSchema = new mongoose.Schema({
  title: String,
  content: String
}, { timestamps: true });
Now every blog will have two extra fields: createdAt and updatedAt.
This is very helpful when you want to show:
- When a user joined
- When a post was last edited
12. RELATIONSHIPS IN MONGOOSE
In the real world, data is connected. Mongoose allows you to relate documents using two methods: 1. Embedding (keep the related data inside the document) 2. Referencing (link documents using their _id). Let’s go step by step.
12.1 Embedding Documents in Schemas
Embedding means saving one document inside another.
Example:
const addressSchema = new mongoose.Schema({
  street: String,
  city: String
});

const userSchema = new mongoose.Schema({
  name: String,
  address: addressSchema // Embedded address
});
Here, the address is embedded inside the user.
When to use:
- When the related data is small
- When you always use both pieces of data together
Think of it like packing socks inside shoes – they always go together.
12.2 Referencing Other Documents (populate)
Referencing means saving only the _id of another document. You can then populate that data when needed.
Step 1: Create two schemas
const authorSchema = new mongoose.Schema({
  name: String
});
const Author = mongoose.model('Author', authorSchema);

const bookSchema = new mongoose.Schema({
  title: String,
  author: {
    type: mongoose.Schema.Types.ObjectId,
    ref: 'Author' // Reference to Author model
  }
});
const Book = mongoose.model('Book', bookSchema);
Here, the Book references the Author using the author's _id.
Step 2: Populate the author data
Book.findOne({ title: "My Book" })
  .populate('author') // This fetches the author details
  .then(book => console.log(book.author.name)); // Now you can access author's name
Now, instead of just the author’s ID, you will get the full author details.
12.3 Creating Parent-Child Relationships
You can use referencing or embedding to make parent-child links.
Example: A user can have many posts
Referencing Example:
const postSchema = new mongoose.Schema({
  title: String,
  content: String,
  user: {
    type: mongoose.Schema.Types.ObjectId,
    ref: 'User'
  }
});
const Post = mongoose.model('Post', postSchema);
Now, each post belongs to a user.
You can then populate the user when showing posts:
Post.find().populate('user').then(posts => console.log(posts));
12.4 One-to-One, One-to-Many, Many-to-Many
One-to-One
Example: A user has one profile. Each profile connects to one user.
One-to-Many
Example: A blog has many comments. Each blog can have many comments.
Many-to-Many
Example: A student can enroll in many courses, and a course can have many students. This creates a two-way connection.
13. ENVIRONMENT VARIABLES & CONFIGURATION
13.1 Using dotenv to Store MongoDB URI
In real projects, we don’t want to keep secret keys or MongoDB connection URLs directly in our code.
Instead, we store them in a file called .env using a package named dotenv.
Step 1: Install dotenv
npm install dotenv
Step 2: Create a .env file
In the root of your project, create a file named .env.
Write this inside:
MONGO_URI="mongodb+srv://username:password@cluster.mongodb.net/myDatabase"
You can also add other secrets like:
JWT_SECRET="your_secret_key"
API_KEY="your_api_key"
Step 3: Use dotenv in your project
At the top of your main file (like app.js), write:
require('dotenv').config();
Then use your variables like this:
const uri = process.env.MONGO_URI;
This hides your MongoDB URI from public code.
13.2 Protecting Secrets and Keys
Why protect secrets?
- If you push your code to GitHub with secrets:
- Anyone can connect to your database
- Your data can be stolen or deleted
To protect your .env file:
- Add this to your
.gitignore file:
.env
- Never share your
.env file publicly.
- Always keep secrets in environment variables (not in the code).
13.3 Switching Between Dev and Production Databases
When you work on a project, you often have:
- Development database (on your laptop)
- Production database (online for real users)
You can manage both using .env files.
Example:
# .env.development
MONGO_URI="mongodb://localhost:27017/devDB"

# .env.production
MONGO_URI="mongodb+srv://user:pass@atlas/prodDB"
Then use process.env.NODE_ENV to choose:
const env = process.env.NODE_ENV || 'development';
const uri = env === 'production' ? process.env.MONGO_URI_PROD : process.env.MONGO_URI_DEV;
Or use a package like dotenv-flow for multiple env files.
14. ERROR HANDLING IN MONGODB & MONGOOSE
In real apps, things go wrong. We must catch errors so our app doesn’t crash, and we can show useful messages. Let’s see how to handle common errors step by step.
14.1 Try-Catch with async/await
In Node.js, when using async functions (like saving to the database), we wrap them in try-catch blocks.
Example:
async function saveUser(user) {
  try {
    const newUser = new User(user);
    await newUser.save();
    console.log("User saved successfully!");
  } catch (error) {
    console.error("Error saving user:", error);
  }
}
Why use try-catch?
try: Runs the codecatch: Runs only if there is an error
This helps stop your app from crashing when something goes wrong.
14.2 Handling Connection Errors
When MongoDB doesn’t connect (wrong URI or no internet), you get a connection error. Use .catch() after mongoose.connect() to catch it.
Example:
mongoose.connect('mongodb://localhost:27017/mydb')
  .then(() => console.log('Connected to MongoDB!'))
  .catch(err => console.error('Connection failed! Make sure MongoDB is running.', err));
14.3 Schema Validation Errors
If your schema has rules like required: true or minlength: 3, and the user doesn’t follow them, Mongoose will throw a validation error.
Example:
const userSchema = new mongoose.Schema({
  name: { type: String, required: true }
});
const User = mongoose.model('User', userSchema);
If you try:
const badUser = new User({});
badUser.save();
It gives an error: "User validation failed: name: Path name is required."
How to catch:
try {
  await badUser.save();
} catch (error) {
  if (error.name === 'ValidationError') {
    console.error("Validation Error:", error.message);
  }
}
14.4 Duplicate Key Errors
If you create a field with unique: true, MongoDB won’t let you save duplicate values.
Example:
const userSchema = new mongoose.Schema({
  email: { type: String, unique: true }
});
If two users have the same email, it throws a duplicate key error.
How to handle:
try {
  await newUser.save();
} catch (error) {
  if (error.code === 11000) { // MongoDB duplicate key error code
    console.error("Duplicate Error: Email already exists.");
  }
}
14.5 Error Messages for Beginners
When sending error messages to users or beginners, use simple words.
Instead of this:
{
  "errors": {
    "name": {
      "kind": "required",
      "message": "Path `name` is required.",
      "name": "ValidatorError",
      "path": "name"
    }
  }
}
Show this:
{ "message": "Name is required." }
You can customize messages too:
name: { type: String, required: [true, 'Name field is required.'] }
15. MONGODB COMPASS (GUI TOOL)
MongoDB Compass is a visual tool to work with MongoDB. You don’t need to use code or terminal — everything can be done with clicks. It’s great for beginners who want to see their data easily.
15.1 Connecting to Local and Cloud Databases
a) Local MongoDB
- Open MongoDB Compass
- In the connection box, enter:
mongodb://localhost:27017
- Click Connect
You’ll see your local databases and collections.
b) MongoDB Atlas (Cloud)
- Go to MongoDB Atlas
- Copy your connection string (from 2.5)
- It looks like:
mongodb+srv://username:password@cluster.mongodb.net/myDatabase
- Paste it into Compass
- Click Connect
Now you can view your cloud database too.
15.2 Browse Collections Visually
Once connected, you can:
- Click on a database name
- See a list of collections (like tables)
- Click on a collection to see the documents inside
Each document shows as a pretty JSON box — no code needed. You can scroll through all your data easily.
15.3 Running Queries from GUI
You can use the Filter box to search for documents.
Example 1: Find users with age 20
{ "age": 20 }
Example 2: Find users with the name "Ravi"
{ "name": "Ravi" }
You can also:
- Sort documents
- Limit the number of results
- View raw and formatted output
Everything happens with simple clicks and inputs.
15.4 Editing and Deleting Documents Easily
In MongoDB Compass:
- Click on any document
- Click Edit to change values
- Click Delete to remove the document
It’s as simple as using a form: no command line, no code errors.
15.5 Exporting Collections to JSON or CSV
Want to download your data?
- Click the Export button at the top right of the collection view
- Choose JSON or CSV format
- Click Export
- JSON: Good for developers, keeps the structure of your MongoDB documents
- CSV: Good for Excel, Google Sheets, etc.
Now you can share or back up your data anytime.
16. MONGODB ATLAS TIPS
MongoDB Atlas is the cloud version of MongoDB. You can create databases online, access them from anywhere, and manage them using a web dashboard. This section shows some helpful tips to work safely and smartly with MongoDB Atlas.
16.1 IP Whitelisting
IP Whitelisting means choosing who can access your database. MongoDB only allows trusted IP addresses to connect.
To whitelist your IP:
- Go to your MongoDB Atlas Project
- Click Network Access
- Click Add IP Address
- To allow your own IP: Choose Add Current IP Address
- To allow anyone (not safe for production): Enter
0.0.0.0/0
Note: Allowing only your own IP keeps your database safe.
16.2 Creating Users and Setting Roles
Instead of giving access to everyone, create users with limited permissions.
Steps:
- Go to your Database Access tab
- Click Add New Database User
- Set: Username, Password
- Choose User Privileges: Read-only, Read & Write, Admin
Example: Developers can get read & write, while clients can get read-only. This helps protect your data from unwanted changes.
16.3 Monitoring Cluster Performance
MongoDB Atlas gives you tools to check: memory usage, CPU load, number of database connections, and slow queries.
To monitor your cluster:
- Go to your Clusters
- Click Metrics on the cluster
- Check graphs like: Operations (reads/writes), Connections, Disk usage
This helps you find:
- If your app is too slow
- If you need to upgrade the cluster
16.4 Backup and Restore Options
Backups save your data so you don’t lose it. MongoDB Atlas offers: daily backups, on-demand backups, and restore from any backup.
Steps to check:
- Go to the Backups tab under your cluster
- You can: Download a backup, Restore to an earlier time
Backups are important when:
- Something breaks your app
- You accidentally delete something
- You need to move data
16.5 Using Database Access Controls
Access Control means who can do what in your database. You can: allow some users to only read, allow others to write, or block access completely.
Use Roles like: read, readWrite, dbAdmin.
These roles control permissions for safety.
You can also: use TLS/SSL for secure connections and enable IP restrictions per user.
17. COMMON BEGINNER MISTAKES
When starting with MongoDB and Mongoose, many beginners make small but important mistakes. Let’s learn what these mistakes are and how to fix them.
17.1 Forgetting to await async calls
In Mongoose, most functions return a promise, which means they are async. If you don’t use await or .then(), the code runs before the database responds.
Mistake:
User.find(users => console.log(users)); // This won't wait
Fix:
await User.find().then(users => console.log(users)); // Awaits for result
Always use await when using async functions.
17.2 Incorrect use of ObjectId
In MongoDB, every document has a unique _id of type ObjectId. When you want to find by _id, you must use mongoose.Types.ObjectId.
Mistake:
User.findById("60c728e8f8f8f8f8f8f8f8f8"); // May not work
This may not work if it's not in ObjectId format.
Fix:
User.findById(new mongoose.Types.ObjectId("60c728e8f8f8f8f8f8f8f8f8"));
Or use findById(id) which handles it automatically:
User.findById(id); // Prefer this
17.3 Not handling connection errors
Some beginners forget to check if the database connected properly.
Mistake:
mongoose.connect('mongodb://localhost:27017/mydb'); // No error handling
If it fails, the app crashes silently.
Fix:
mongoose.connect('mongodb://localhost:27017/mydb')
  .then(() => console.log('DB Connected!'))
  .catch(err => console.error('Connection Failed!', err));
Always catch errors.
17.4 Hardcoding MongoDB URIs
Many beginners write the full connection string inside the code.
Mistake:
mongoose.connect('mongodb+srv://user:pass@cluster.mongodb.net/mydb');
This is not safe. If you push to GitHub, your password is exposed.
Fix:
Store it in a .env file (see 13.1)
MONGO_URI="mongodb+srv://user:pass@cluster.mongodb.net/mydb"
And load it with:
require('dotenv').config();
mongoose.connect(process.env.MONGO_URI);
17.5 Confusing find vs findOne
Many new users mix up these two:
find() returns an arrayfindOne() returns a single document
Mistake:
const user = await User.find({ name: "Ravi" }); // user will be an array
console.log(user.name); // This will be undefined
Fix:
const user = await User.findOne({ name: "Ravi" }); // user will be a single object
console.log(user.name); // Works correctly
Or use find()[0] if you still use find().
17.6 Updating without $ operators
Mongoose needs update operators like $set, $inc, etc.
Mistake:
User.updateOne({ name: "Ravi" }, { age: 25 }); // This may remove other fields.
This may remove other fields if `age` isn't nested or other fields aren't explicitly passed back.
Fix:
User.updateOne({ name: "Ravi" }, { $set: { age: 25 } });
Always use $set to change only one field or specific fields without affecting others.