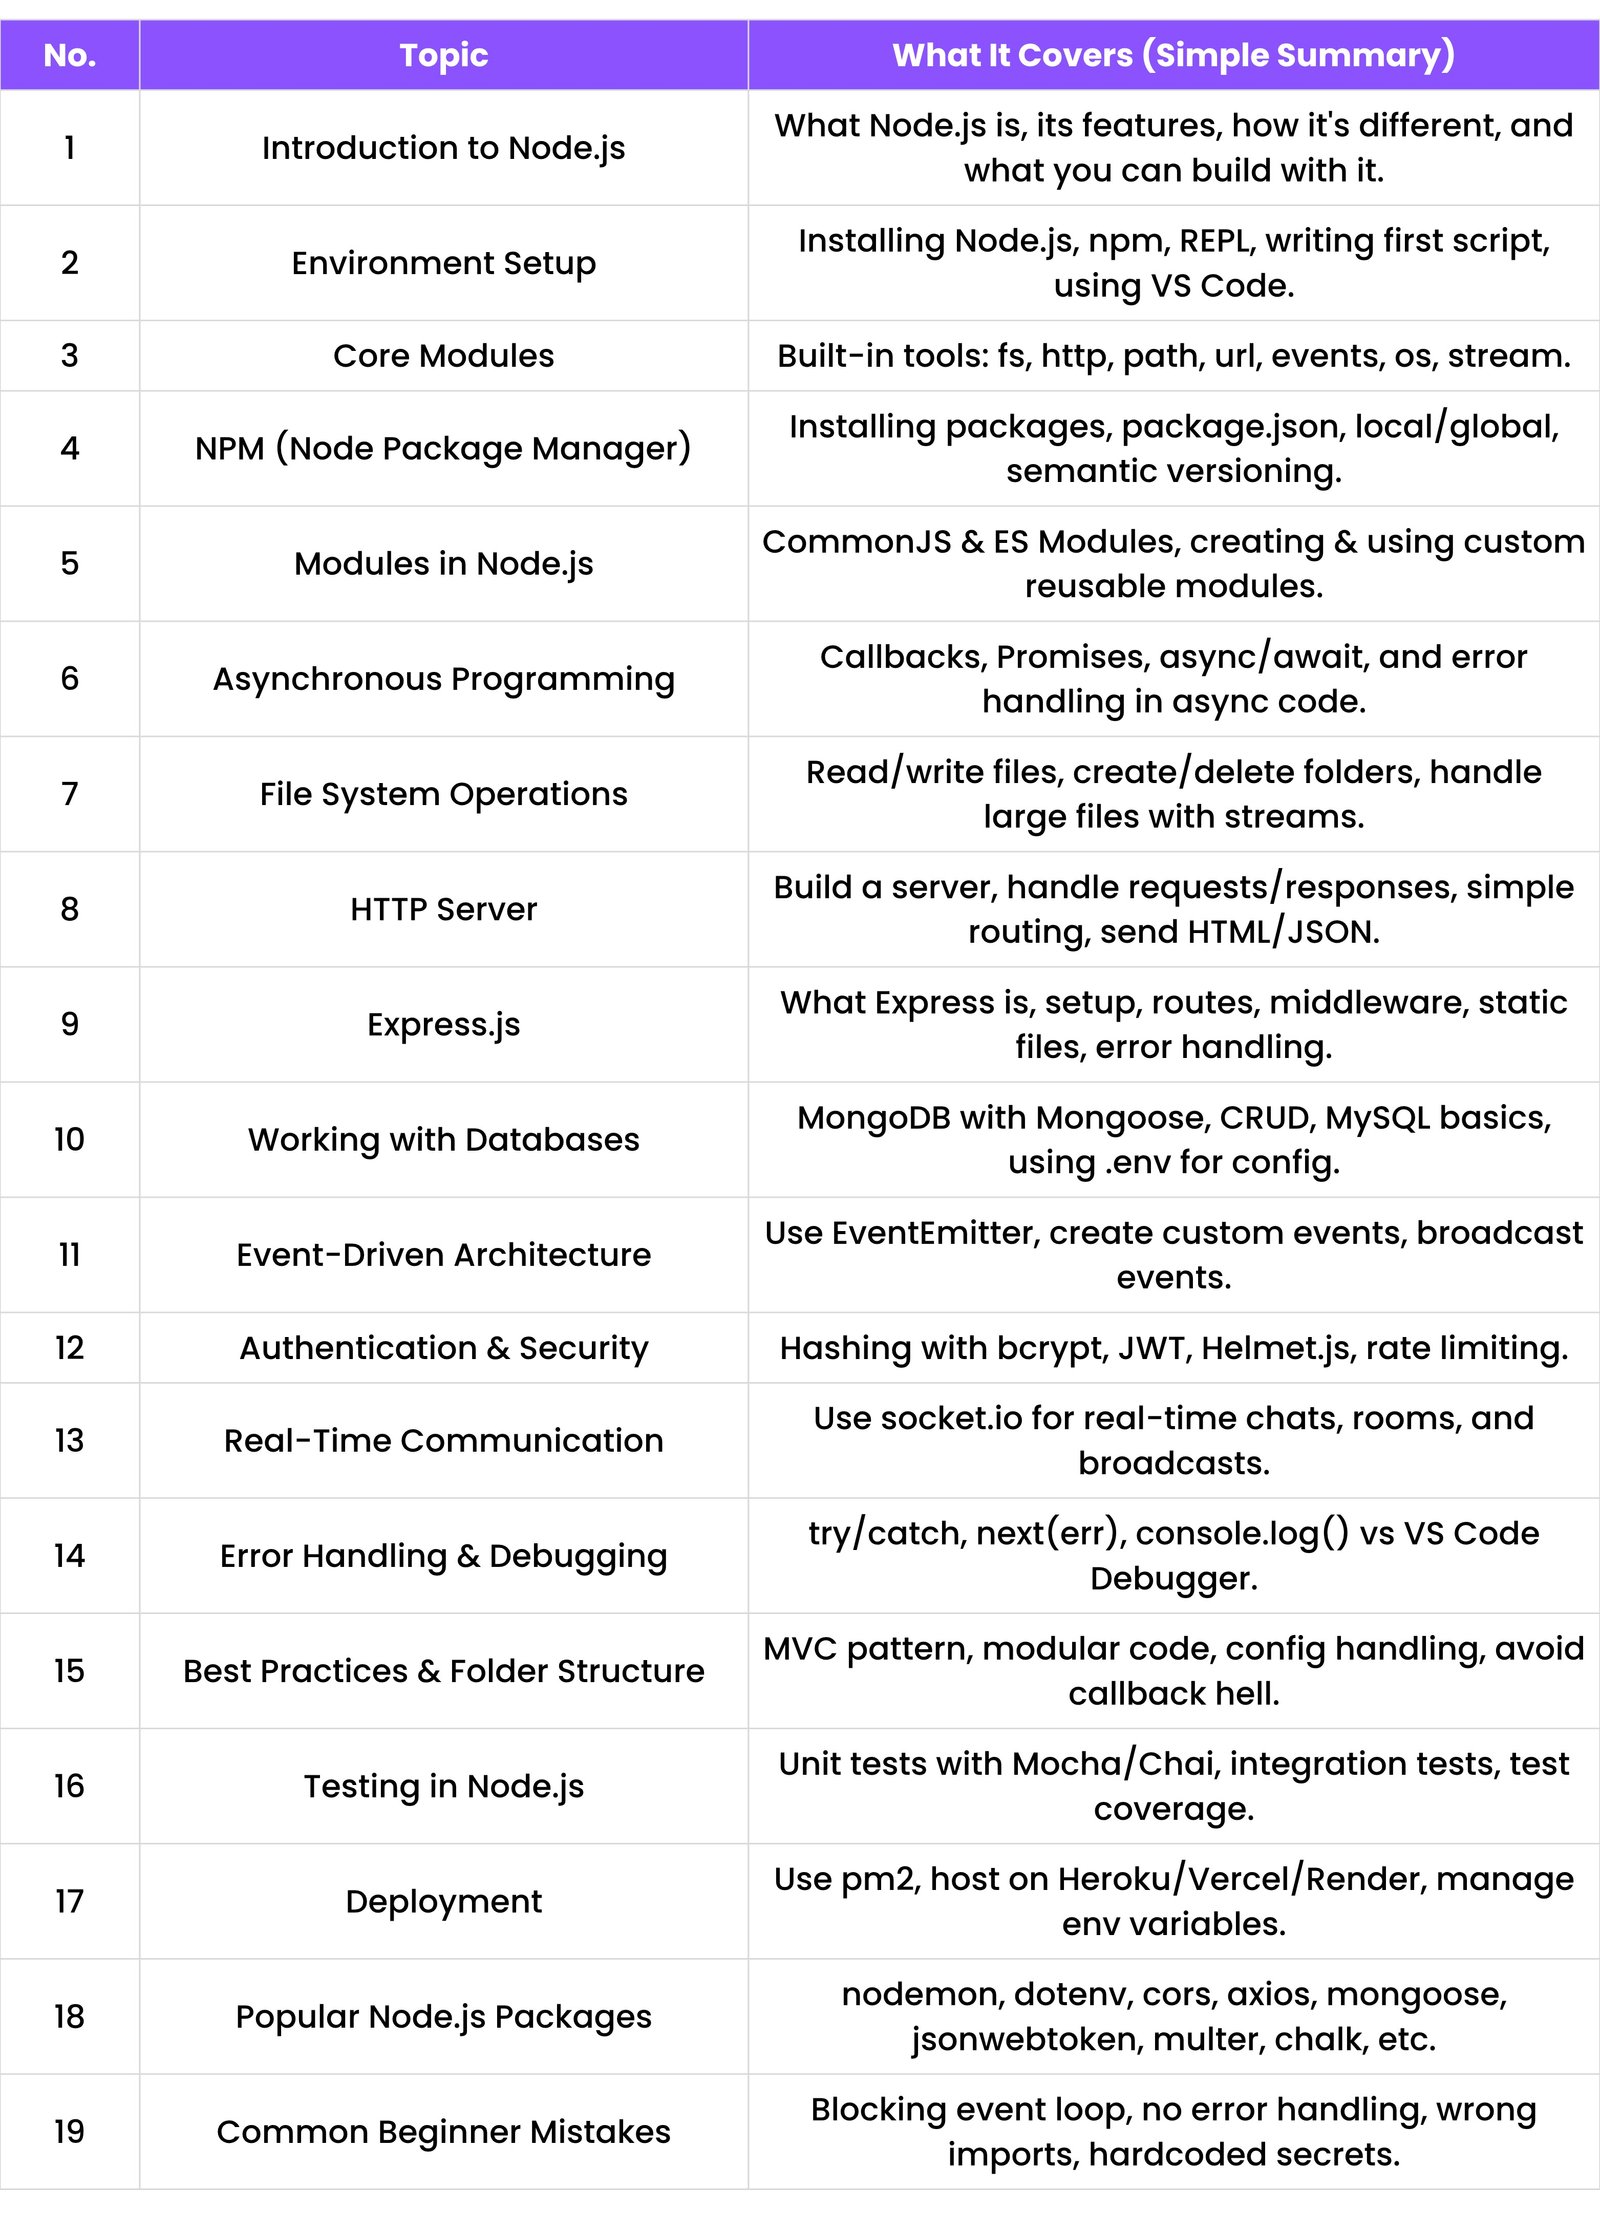
1. INTRODUCTION TO NODE.JS
1.1 What is Node.js?
- Node.js is a tool that helps you run JavaScript outside your browser.
- Think of it like this: normally JavaScript works inside websites (like in Google Chrome), but Node.js lets you run it like a regular computer program.
- In short: JavaScript is for websites, Node.js is for building tools, servers, and apps using JavaScript.
1.2 Features of Node.js
- Fast - It runs code very quickly.
- Non-blocking - It can handle many tasks at once without waiting.
- Uses JavaScript - No need to learn a new language if you know JS.
- Cross-platform - Works on Windows, Mac, and Linux.
- Big Community - Many people use it and help each other through packages on npm.
1.3 Node.js vs Traditional Backend
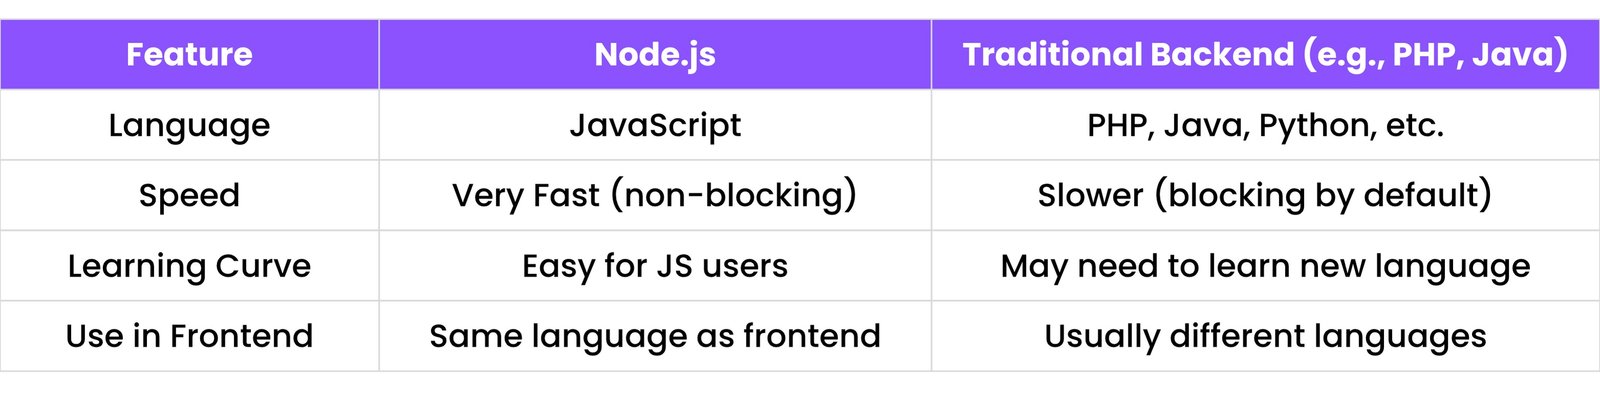
In simple terms: Node.js is a great choice if you already know JavaScript. It's fast, modern, and built for handling many connections at once.
1.4 Use Cases
Where can we use Node.js?
- Web Servers - Building the backend for websites and web applications.
- APIs - Creating services that connect the frontend (website) and backend (database).
- Real-time Apps - Like live chat applications or online multiplayer games.
- Developer Tools - Creating command-line tools to automate tasks.
- Microservices - Building small, independent parts of a larger application.
2. ENVIRONMENT SETUP
2.1 Installing Node.js & npm
- Go to https://nodejs.org
- Download the "LTS" (Long Term Support) version.
- Install it like any other software.
- This will install both Node.js and npm (Node Package Manager).
- To check if it's installed, open your terminal and run:
node -v
npm -v
This shows the version numbers.
2.2 REPL (Read-Eval-Print Loop)
- The REPL is like a playground for trying out Node.js code instantly.
- To open it:
- Open your Terminal or Command Prompt.
- Type
node and press Enter.
- You can now write JavaScript and see the result immediately.
- Example:
> 2 + 2
4
> const name = "World";
> `Hello, ${name}!`
'Hello, World!'
To exit the REPL, type .exit and press Enter.
2.3 Creating Your First Script
- Open a code editor (like VS Code).
- Create a new file named
app.js.
- Write this code inside:
console.log("Hello, Node.js!");
- Run it from your terminal:
node app.js
- You'll see the output:
Hello, Node.js!
2.4 Node.js in VS Code
Steps:
- Download VS Code from https://code.visualstudio.com.
- Open your project folder in VS Code.
- Create your
.js files.
- Use the integrated terminal in VS Code (you can open it with the `Ctrl + `` key).
- Run your code using
node filename.js right inside the editor.
It's an easy and efficient way to write, edit, and run your Node.js code in one place.
3. CORE MODULES IN NODE.JS
Core modules are tools that come built-in with Node.js. You don't need to install them—just use them by `require`-ing them.
3.1 fs - File System
- The
fs module helps you read and write files on your computer.
- Example:
const fs = require('fs');

// Writes text to a file named 'hello.txt'
fs.writeFileSync('hello.txt', 'This is Node.js');
This will create a file called hello.txt in the same folder.
3.2 path - Path Handling
- The
path module helps you work with file and folder paths correctly on any operating system.
- Example:
const path = require('path');

// Joins path segments together safely
const filePath = path.join(__dirname, 'folder', 'file.txt');
console.log(filePath);
It joins paths safely, handling differences between Windows (`\`) and Mac/Linux (`/`).
3.3 http - Creating Servers
- This module lets you create your own web server.
- Example:
const http = require('http');

const server = http.createServer((req, res) => {
    res.end('Hello from server');
});

server.listen(3000);
Now visit: http://localhost:3000 in your browser.
3.4 url - URL Parsing
- The
url module breaks a website link into its different parts.
- Example:
const url = require('url');

const parsed = url.parse('https://example.com/product?id=100');
console.log(parsed.query); // Output: 'id=100'
It shows parts like path, query, host, etc.
3.5 os - Operating System Info
- Gives details about your computer's operating system.
- Example:
const os = require('os');

console.log(os.platform()); // e.g., 'win32', 'darwin'
console.log(os.freemem());  // Shows free memory in bytes
3.6 events - Event Handling
- Lets you create, listen for, and respond to custom events.
- Example:
const EventEmitter = require('events');

const emitter = new EventEmitter();

// Listen for the 'start' event
emitter.on('start', () => {
    console.log('Started!');
});

// Trigger the 'start' event
emitter.emit('start');
It's like saying: "When I say `start`, run this function."
3.7 stream - Stream API
- Used to handle large files (like videos or big logs) piece by piece, instead of loading everything into memory at once.
- Example:
const fs = require('fs');

const readStream = fs.createReadStream('bigfile.txt');

readStream.on('data', chunk => {
    console.log('Reading chunk:', chunk.toString());
});
This reads the file in small parts, which is very memory-efficient.
4. NPM (NODE PACKAGE MANAGER)
NPM helps you install ready-made code packages from other developers. These packages add new features to your project quickly.
4.1 What is npm?
- NPM stands for Node Package Manager.
- It comes automatically with Node.js.
- It's the world's largest software registry, with millions of packages available.
4.2 Installing Packages (npm install)
- To install a package for your project:
npm install package-name
Example:
npm install chalk
This downloads the `chalk` package and saves it in a `node_modules` folder in your project.
4.3 Local vs Global Packages
- Local Package - Used only in your current project.
npm install chalk
Global Package - A tool you can use from the command line in any project.
npm install -g nodemon
Global means "install it on your computer, not just in this one project folder".
4.4 package.json and package-lock.json
package.json - A file that keeps a list of all packages your project depends on. It's like your project's "ingredients list".
{
  "name": "my-app",
  "dependencies": {
    "chalk": "^5.0.0"
  }
}
package-lock.json - A detailed file that records the exact version of every package installed. This ensures that everyone working on the project uses the same versions.
4.5 Semantic Versioning
Package versions use three numbers: major.minor.patch
Example: 1.2.3
1 (Major) → Big, potentially breaking changes.2 (Minor) → New features, but still backward-compatible.3 (Patch) → Bug fixes only.
Symbols in `package.json`:
^1.2.3 → Allow minor and patch updates (e.g., 1.3.0, 1.2.4).~1.2.3 → Allow only patch updates (e.g., 1.2.4).
5. MODULES IN NODE.JS
In real life, when you work on a big project, you don’t write everything in one giant file. You break it into small, manageable files. These files are called modules in Node.js.
Node.js primarily uses two types of module systems:
- CommonJS (the traditional, default style)
- ES Modules (the modern, standard JavaScript style)
5.1 What are CommonJS Modules?
- CommonJS is the original module system in Node.js.
- It uses two main keywords:
require() — to import a module.module.exports — to export something from a module.
- Example:
math.js
function add(a, b) {
    return a + b;
}
module.exports = add;
app.js
const add = require('./math');
console.log(add(1, 2)); // Output: 3
This is like making a tool in one file (`math.js`) and using it in another (`app.js`).
5.2 What are ES Modules?
- ES Modules use the modern JavaScript syntax:
import and export.
- To use ES Modules in Node.js, you need to do one of the following:
- Name your files with a
.mjs extension.
- OR
- Add
"type": "module" to your package.json file.
- Example:
math.mjs
export function add(a, b) {
    return a + b;
}
app.mjs
import { add } from './math.mjs';
console.log(add(1, 2)); // Output: 3
Use ES Modules if you're building a modern application or prefer the latest JavaScript features.
5.3 Creating and Reusing Your Own Modules
- You can create any number of modules to organize your code.
- Example project structure:
math.js — contains math functionsuser.js — contains user-related functionsserver.js — your main application file
math.js
function multiply(a, b) {
    return a * b;
}
module.exports = multiply;
server.js
const multiply = require('./math');
console.log(multiply(4, 5)); // Output: 20
Why use modules?
- Organized Code: Keeps related functions together.
- Reusable: Use the same module in different parts of your app.
- Maintainable: Easier to find and fix bugs.
6. ASYNCHRONOUS PROGRAMMING
Node.js can handle many tasks at the same time without waiting for one to finish. This is called asynchronous programming, and it's what makes Node.js so fast and efficient.
6.1 Callbacks (Old Method)
- A callback is a function you pass into another function, which gets called after the first function finishes its task.
- Example:
function greet(name, callback) {
    setTimeout(() => {
        console.log(`Hello, ${name}!`);
        callback();
    }, 1000);
}

greet('Ravi', function() {
    console.log("Welcome to Node.js!");
});
Problem: If you have many callbacks nested inside each other, your code becomes hard to read. This is known as "callback hell".
6.2 Promises (Better Way)
- A promise is an object that represents a future result. It's like saying: “I promise I’ll finish this task. When I'm done, I'll either give you the result (resolve) or an error (reject).”
- Creating a Promise:
const myPromise = new Promise((resolve, reject) => {
    let success = true;
    if (success) {
        resolve("It worked!");
    } else {
        reject("It failed!");
    }
});
Using a Promise with .then() for success and .catch() for failure:
myPromise
    .then(result => console.log(result))
    .catch(error => console.error(error));
6.3 async/await (Modern Way)
async/await is modern syntax that makes asynchronous code look and feel like regular, synchronous code.- You use:
async before a function declaration to make it asynchronous.await before a promise to pause the function until the promise is resolved.
- Example:
function fetchData() {
    return new Promise(resolve => {
        setTimeout(() => {
            resolve("Data loaded");
        }, 1000);
    });
}

async function showData() {
    console.log("Fetching data...");
    const result = await fetchData(); // Pauses here for 1 second
    console.log(result);
}

showData();
This is the cleanest and most recommended way to handle async operations in modern Node.js.
6.4 Error Handling in async/await
- Always wrap your
await calls in a try...catch block to handle potential errors gracefully.
- Example:
async function generateReport() {
    try {
        const data = await getData(); // This might fail
        console.log("Report data:", data);
    } catch (error) {
        console.log("Something went wrong:", error);
    }
}
This prevents your application from crashing if the promise is rejected.
7. FILE SYSTEM OPERATIONS (WITH FS MODULE)
To work with files (like reading or writing text files), Node.js provides the built-in fs (File System) module. It helps us manage files and folders on the computer.
7.1 Reading/Writing Files (Sync vs Async)
You can read and write files in two ways:
- Sync (Synchronous) — Waits for the file operation to complete before moving on. This can block other code from running.
- Async (Asynchronous) — Performs the file operation in the background and continues with other tasks. This is the recommended approach in Node.js.
Example (Sync):
const fs = require('fs');
const fileData = fs.readFileSync('file.txt', 'utf8');
console.log(fileData);
Example (Async):
const fs = require('fs');
fs.readFile('file.txt', 'utf8', (err, data) => {
    if (err) throw err;
    console.log(data);
});
console.log("Reading file..."); // This will print first
7.2 Creating/Deleting Directories
Create a Folder:
const fs = require('fs');
fs.mkdir('myFolder', (err) => {
    if (err) throw err;
    console.log('Folder created!');
});
Delete a Folder:
const fs = require('fs');
fs.rmdir('myFolder', (err) => {
    if (err) throw err;
    console.log('Folder deleted!');
});
7.3 File Streams
Streams are used when working with very large files. Instead of reading the entire file into memory at once, Node.js reads it in small, manageable chunks.
Read Stream:
const fs = require('fs');
const readStream = fs.createReadStream('bigfile.txt');

readStream.on('data', chunk => {
    console.log('Reading chunk:', chunk.toString());
});
This approach is memory-efficient and prevents your application from crashing due to large file sizes.
8. HTTP SERVER
Node.js has a built-in module called http that allows you to create a web server without any external libraries.
8.1 Creating a Simple Server
const http = require('http');

const server = http.createServer((req, res) => {
    res.end('Hello from Node.js server!');
});

server.listen(3000, () => {
    console.log('Server running at http://localhost:3000');
});
Explanation:
http.createServer() creates a new server instance.- The callback function handles incoming requests (
req) and sends back responses (res).
res.end() sends a message to the browser and closes the connection.server.listen(3000) starts the server on port 3000.
8.2 Handling Requests and Responses
When a user visits your server, you can inspect the request object (req) to get information:
req.url → The URL path the user requested (e.g., `/about`, `/contact`).req.method → The HTTP method used (e.g., `GET`, `POST`).
8.3 Routing Basics
Routing means sending different responses based on the URL path requested by the user.
Example:
const server = http.createServer((req, res) => {
    if (req.url === '/') {
        res.end('Welcome Home!');
    } else if (req.url === '/about') {
        res.end('About Page!');
    } else {
        res.writeHead(404); // Set status code for Not Found
        res.end('Page Not Found!');
    }
});
Note: This manual routing becomes difficult in large applications. That’s why frameworks like Express.js are used.
8.4 Sending JSON and HTML Responses
You can send HTML or JSON as responses by setting the correct `Content-Type` header.
Send HTML:
res.writeHead(200, { 'Content-Type': 'text/html' });
res.end('<h1>Hello HTML Page!</h1>');
Send JSON:
res.writeHead(200, { 'Content-Type': 'application/json' });
res.end(JSON.stringify({ message: "Hello JSON!" }));
This is how a server communicates with a browser using different data formats.
9. EXPRESS.JS (Most Used Framework)
Express.js is a minimal and flexible Node.js web application framework that provides a robust set of features to develop web and mobile applications. It makes creating servers and APIs much simpler.
9.1 What is Express.js?
- Express is like a set of helpful shortcuts for the built-in Node.js
http module.
- It simplifies tasks like routing, handling requests, and managing middleware.
- It is the most popular framework for building backends with Node.js.
9.2 Setting Up an Express App
Step 1: Install Express
npm install express
Step 2: Create a basic app
const express = require('express');
const app = express();

app.get('/', (req, res) => {
    res.send('Welcome to Express.js!');
});

app.listen(3000, () => {
    console.log('Server is running on port 3000');
});
Explanation:
express() creates an Express application.app.get() defines a route that handles GET requests to the root URL (`/`).res.send() sends a response to the client.
9.3 Routing & Middleware
Routing
Express makes routing clean and easy:
app.get('/', (req, res) => {
    res.send('Home Page');
});

app.get('/about', (req, res) => {
    res.send('About Page');
});
Middleware
Middleware functions are functions that have access to the request (`req`), response (`res`), and the `next` function in the application’s request-response cycle. They can execute code, make changes, or end the cycle.
// A simple logger middleware
app.use((req, res, next) => {
    console.log(`${req.method} request for '${req.url}'`);
    next(); // Pass control to the next middleware
});
9.4 Serving Static Files
You can serve static files like images, CSS, and JavaScript files using the `express.static` built-in middleware.
// Serve files from the 'public' directory
app.use(express.static('public'));
Now, if you have a file named `public/style.css`, users can access it at `http://localhost:3000/style.css`.
9.5 Error Handling
To handle routes that don't exist (404 errors), you can add a middleware at the end of your file.
// This middleware runs if no other route matches
app.use((req, res) => {
    res.status(404).send('404 Page Not Found!');
});
10. WORKING WITH DATABASES
Node.js can connect to almost any database. The two most common types are:
- MongoDB → A NoSQL database that stores data in flexible, JSON-like documents.
- MySQL/PostgreSQL → SQL databases that store data in structured tables with rows and columns.
10.1 Connecting to MongoDB using Mongoose
Mongoose is a library that makes it easy to work with MongoDB in Node.js.
Step 1: Install Mongoose
npm install mongoose
Step 2: Connect to your MongoDB database
const mongoose = require('mongoose');
mongoose.connect('mongodb://localhost:27017/myDB')
    .then(() => console.log('MongoDB connected!'))
    .catch(err => console.log(err));
This connects your app to a local MongoDB instance. Replace `myDB` with your database name.
10.2 CRUD Operations (Create, Read, Update, Delete)
Let’s create a simple User model and perform all four basic database actions.
1. Define a Schema and Model
const userSchema = new mongoose.Schema({
    name: String,
    age: Number
});
const User = mongoose.model('User', userSchema);
Create (Add a new user)
const newUser = new User({ name: 'Ravi', age: 30 });
newUser.save();
Read (Find users)
User.find().then(users => console.log(users));
Update (Modify a user)
User.updateOne({ name: 'Ravi' }, { age: 31 }).then(() => console.log('User updated'));
Delete (Remove a user)
User.deleteOne({ name: 'Ravi' }).then(() => console.log('User deleted'));
10.3 MySQL with Node.js
To work with MySQL, you can use the `mysql` package.
Install it:
npm install mysql
Connecting to MySQL:
const mysql = require('mysql');
const connection = mysql.createConnection({
    host: 'localhost',
    user: 'root',
    password: '',
    database: 'testdb'
});

connection.connect((err) => {
    if (err) throw err;
    console.log('MySQL Connected!');
});
Example Query:
connection.query('SELECT * FROM users', (err, results) => {
    if (err) throw err;
    console.log(results);
});
10.4 Using .env for Config
It's a best practice to store sensitive data (like database passwords and API keys) in a .env file, not directly in your code.
Step 1: Install `dotenv`
npm install dotenv
Step 2: Create a .env file
DB_URL=mongodb://localhost:27017/myDB
PORT=3000
Step 3: Use it in your app
require('dotenv').config();
const DB_URL = process.env.DB_URL; // Access the DB_URL variable
const PORT = process.env.PORT || 3000; // Access PORT or use 3000 as a default
This keeps your sensitive information safe and separate from your codebase.
11. EVENT-DRIVEN ARCHITECTURE
Node.js is built on an event-driven model. It means: "When something happens (an event), do something in response." Node provides a core module called EventEmitter to make this easy.
11.1 EventEmitter in Action
Step 1: Import and create an emitter
const EventEmitter = require('events');
const emitter = new EventEmitter();
Step 2: Listen for an event with `.on()`
emitter.on('greet', () => {
    console.log('Hello World!');
});
Step 3: Trigger (emit) the event with `.emit()`
emitter.emit('greet');
Output:
Hello World!
11.2 Custom Events with Data
You can also pass data along with your events.
emitter.on('userAdded', (name) => {
    console.log(`User added: ${name}`);
});

emitter.emit('userAdded', 'Max'); // Pass 'Max' as data
11.3 Broadcasting Events
You can trigger one event that causes other events to run, creating a chain of actions.
emitter.on('start', () => {
    console.log('Starting process...');
    emitter.emit('nextStep');
});

emitter.on('nextStep', () => {
    console.log('Doing the next step...');
});

emitter.emit('start');
Output:
Starting process...
Doing the next step...
12. AUTHENTICATION & SECURITY IN NODE.JS
When users sign up or log in, we must secure their passwords and control who can access what. We use tools like:
bcrypt → to hash (scramble) passwordsJWT → to keep users logged in securelyhelmet.js → to protect the app from common web attacksexpress-rate-limit → to prevent spamming or too many requests
12.1 Hashing with bcrypt
Passwords should never be stored directly in the database. We hash them—this means we scramble them into a long, irreversible string.
Step 1: Install `bcrypt`
npm install bcrypt
Step 2: Hash a Password Before Saving
const bcrypt = require('bcrypt');
const password = 'mypassword123';
bcrypt.hash(password, 10, (err, hash) => {
    console.log('Hashed Password:', hash);
    // Store this hash in your database
});
Step 3: Check Password on Login
// 'hash' is the hashed password from your database
bcrypt.compare('mypassword123', hash, (err, result) => {
    if (result) {
        console.log('Password is correct!');
    } else {
        console.log('Wrong password!');
    }
});
12.2 JWT (JSON Web Tokens)
JWT is used to keep users logged in after they sign in once. The server sends a secret token to the client, which is sent back with every request to prove the user is authenticated.
Step 1: Install `jsonwebtoken`
npm install jsonwebtoken
Step 2: Sign (Create) a Token on Login
const jwt = require('jsonwebtoken');
const token = jwt.sign({ userId: 123 }, 'YourSecretKey', { expiresIn: '1h' });
Step 3: Verify the Token on Protected Routes
jwt.verify(token, 'YourSecretKey', (err, decoded) => {
    if (err) {
        console.log('Invalid token');
    } else {
        console.log('Valid user:', decoded);
    }
});
Use a .env file to store your secret key: JWT_SECRET=YourSecretKey.
12.3 Helmet.js (Security Headers)
Helmet helps protect your Express app from common web vulnerabilities by setting various HTTP headers appropriately.
Step 1: Install `helmet`
npm install helmet
Step 2: Use it in your app
const express = require('express');
const helmet = require('helmet');
const app = express();
app.use(helmet());
12.4 Rate Limiting
This prevents users from sending too many requests in a short period (e.g., to prevent login spam or brute-force attacks).
Step 1: Install `express-rate-limit`
npm install express-rate-limit
Step 2: Use it in your app
const rateLimit = require('express-rate-limit');
const limiter = rateLimit({
    windowMs: 15 * 60 * 1000, // 15 minutes
    max: 100, // Limit each IP to 100 requests per windowMs
    message: 'Too many requests from this IP, please try again after 15 minutes'
});
app.use(limiter);
This helps protect your server from being overloaded by bots or malicious users.
13. REAL-TIME COMMUNICATION
Normal websites wait for the user to refresh the page to see updates. Real-time apps (like chat or live notifications) show updates instantly. This is done using WebSockets, and the socket.io library makes it easy.
13.1 Using WebSockets with socket.io
WebSockets create a persistent, two-way connection between the user's browser and the server.
Step 1: Install `socket.io`
npm install socket.io
Step 2: Create a Socket Server
const express = require('express');
const http = require('http');
const socketio = require('socket.io');

const app = express();
const server = http.createServer(app);
const io = socketio(server);

io.on('connection', (socket) => {
    console.log('A user connected');
    socket.on('disconnect', () => {
        console.log('User disconnected');
    });
});

server.listen(3000);
Now your server is ready for real-time connections.
13.2 Real-Time Chat Example
Frontend HTML (client-side):
<script src="/socket.io/socket.io.js"></script>
<script>
    const socket = io();

    // Send a message to the server
    socket.emit('message', 'Hello from client!');

    // Listen for messages from the server
    socket.on('message', (data) => {
        console.log('Got message:', data);
    });
</script>
Backend (server-side):
io.on('connection', (socket) => {
    socket.on('message', (msg) => {
        io.emit('message', msg); // Send the message to all connected clients
    });
});
Now, whatever one user sends, all other connected users will see instantly.
13.3 Rooms & Broadcasting Events
You can group users into rooms, like for different chat groups or game lobbies.
Joining a Room:
socket.join('room1');
Sending a Message to a Specific Room:
io.to('room1').emit('message', 'Hello room1!');
Now, only users who have joined `room1` will receive this message. This is essential for building multi-user applications.
14. ERROR HANDLING & DEBUGGING
When building applications, things will inevitably go wrong. We need to handle errors properly to prevent crashes and use debugging tools to find and fix issues.
14.1 Try/Catch & next(err)
`try...catch` — For handling synchronous and `async/await` errors.
try {
    // Code that might throw an error
    throw new Error('Something went wrong!');
} catch (error) {
    console.error('Caught an error:', error.message);
}
Error Handling in Express with `next(err)`
In Express, you can pass errors to a dedicated error-handling middleware.
app.get('/broken', (req, res, next) => {
    const error = new Error('This route is broken!');
    next(error); // Pass error to the error handler
});

// Error-handling middleware (must have 4 arguments and be defined last)
app.use((err, req, res, next) => {
    console.error(err.stack);
    res.status(500).send('Something broke!');
});
14.2 Built-in Debugging Tools
Common ways to debug your Node.js code:
console.log() — The simplest way to print variable values and check code flow.debugger; — A statement that pauses code execution at that point if a debugger is attached.- Breakpoints — Set points in your code editor (like VS Code) where the execution will pause, allowing you to inspect variables.
Example with `debugger`:
function calculate(a, b) {
    let sum = a + b;
    debugger; // Code will pause here if run with a debugger
    return sum;
}
console.log(calculate(5, 3));
14.3 console.log() vs VS Code Debugging
Both are useful. Start with console.log() for simple checks, but use a debugger for more complex issues.

15. BEST PRACTICES & FOLDER STRUCTURE
Keeping your project clean and organized is crucial for scaling, debugging, and collaborating with a team.
15.1 MVC Pattern in Node.js
MVC stands for Model, View, Controller. It's a popular way to structure applications.
- Model → Manages the data and database logic (e.g., Mongoose schemas).
- View → The user interface (e.g., HTML templates, or handled by a frontend framework like React).
- Controller → Handles the application logic, processing requests and sending responses (e.g., route handlers).
Example Folder Structure:
my-app/
├── controllers/
│   └── userController.js
├── models/
│   └── userModel.js
├── routes/
│   └── userRoutes.js
├── views/ (optional for APIs)
├── app.js
└── package.json
15.2 Environment-Based Config
Use different configurations for development, testing, and production environments.
Use a .env file to store secrets and environment-specific values.
Access in your app:
require('dotenv').config();
const DB_HOST = process.env.DB_HOST;
Use a separate .env.production file for your live server settings.
15.3 Modular Coding
Break your application into smaller, reusable modules.
Instead of writing all your logic in a single app.js file, split it up:
userController.js — handles user-related logic.productController.js — handles product-related logic.db.js — handles the database connection.
Benefits:
- Easier to manage and maintain.
- Promotes code reuse.
- Results in a cleaner, more organized structure.
15.4 Avoiding Callback Hell
Callback Hell refers to deeply nested callbacks, which are hard to read and maintain:
// Example of Callback Hell
// getData(function(data) {
//     processData(data, function(processed) {
//         saveData(processed, function(result) {
//             console.log(result);
//         });
//     });
// });
Use Promises or, even better, async/await to write cleaner code:
async function performOperations() {
    try {
        const data = await getData();
        const processed = await processData(data);
        const result = await saveData(processed);
        console.log(result);
    } catch (error) {
        console.error("Operation failed:", error);
    }
}
16. TESTING IN NODE.JS
Testing helps ensure your code works correctly and reliably before you deploy it. There are three main types of testing in Node.js:
16.1 Unit Testing with Mocha & Chai
Unit Testing checks the smallest parts of your application in isolation (e.g., a single function).
- Mocha is a test runner (it runs your tests and provides structure).
- Chai is an assertion library (it provides functions to check if results are correct).
Step 1: Install Mocha & Chai
npm install mocha chai --save-dev
Step 2: Create a function to test (e.g., `math.js`)
// math.js
function add(a, b) {
    return a + b;
}
module.exports = add;
Step 3: Write a test file (e.g., `test/math.test.js`)
// test/math.test.js
const assert = require('chai').assert;
const add = require('../math');

describe('Math Functions', () => {
    it('should return the sum of two numbers', () => {
        assert.equal(add(2, 3), 5);
    });
});
Step 4: Add a test script to `package.json`
{
  "scripts": {
    "test": "mocha"
  }
}
Step 5: Run your tests
npm test
16.2 Integration Testing
Integration testing checks if multiple parts of your application work together correctly (e.g., testing if an API endpoint correctly interacts with the database).
Tools:
supertest is a popular library for testing HTTP endpoints.- Combine it with Mocha & Chai for a full testing suite.
Example:
// test/app.test.js
const request = require('supertest');
const app = require('../app'); // Your main Express app file

describe('GET /users', () => {
    it('should return a list of users', async () => {
        const res = await request(app).get('/users');
        expect(res.statusCode).to.equal(200);
        expect(res.text).to.equal('List of users');
    });
});
16.3 Test Coverage
Test coverage measures how much of your code is executed by your tests. It helps you find untested parts of your application.
Tool: `nyc` (the command-line tool for Istanbul)
Update `package.json`:
{
  "scripts": {
    "test": "mocha",
    "coverage": "nyc npm test"
  },
  "devDependencies": {
    "nyc": "^15.1.0"
  }
}
Run:
npm run coverage
This will generate a report showing the percentage of your code covered by tests.
17. DEPLOYMENT IN NODE.JS
Once your application is ready, you need to deploy it—which means putting it on a server so people can access it online.
17.1 Using pm2 for Production
pm2 is a process manager that keeps your Node.js application running forever, even if it crashes. It also helps with restarting the app automatically and managing logs.
Step 1: Install `pm2` globally
npm install -g pm2
Step 2: Start your app with pm2
pm2 start app.js
Step 3: Save the process list
pm2 save
Step 4: Create a startup script (to auto-start on server reboot)
pm2 startup
This is great for Linux VPS servers like AWS EC2, DigitalOcean, etc.
17.2 Hosting on Heroku, Vercel, or Render
You can host your Node.js app online for free or at a low cost using platforms like these.
Heroku (good for beginners):
- Create a Heroku account and install the Heroku CLI.
- Initialize git in your project:
git init
heroku create
git add .
git commit -m "Initial commit"
git push heroku master
Vercel or Render (modern alternatives):
- Go to a platform like Render.
- Connect your GitHub account.
- Select your repository.
- Set the start command:
node app.js.
- Add any necessary environment variables.
- Deploy!
These platforms often offer auto-deployment whenever you push new changes to GitHub.
17.3 Environment Variables in Production
Your .env file should never be uploaded to version control (like GitHub). Instead, you should set environment variables directly in your hosting provider's dashboard.
Example on Heroku:
heroku config:set DB_URL=your_production_db_url
In your app:
// This line is still useful for local development
require('dotenv').config();

// In production, Heroku will provide this variable
const dbUrl = process.env.DB_URL;
This keeps your sensitive data safe and separate from your code.
18. POPULAR NODE.JS PACKAGES
Node.js has a massive ecosystem of helpful packages that can make development faster and easier. Here are some must-know packages for beginners:
18.1 nodemon – Auto Restart
- Automatically restarts your server whenever you make changes to your code.
- Saves a lot of time during development.
In package.json:
{
  "scripts": {
    "dev": "nodemon app.js"
  }
}
Run with:
npm run dev
18.2 dotenv – Manage Secrets
- Loads environment variables from a
.env file, so you can hide API keys, database URLs, etc.
Create .env:
API_KEY=your_secret_api_key
Use in your app:
require('dotenv').config();
const apiKey = process.env.API_KEY;
18.3 cors – Fix Cross-Origin Errors
- Allows your frontend application to make requests to your backend API, even if they are on different domains or ports.
Usage:
const cors = require('cors');
app.use(cors());
18.4 axios – Make HTTP Requests
- A promise-based library that helps you make API calls (GET, POST, etc.) from your Node.js server to other services.
Usage:
const axios = require('axios');
axios.get('https://api.example.com/data')
    .then(response => console.log(response.data));
18.5 express-validator – Validate Inputs
- A set of middleware that helps you validate user inputs (e.g., checking if an email is valid or a password meets length requirements).
Usage:
const { body, validationResult } = require('express-validator');

app.post('/register', [
    body('email').isEmail(),
    body('password').isLength({ min: 5 })
], (req, res) => {
    const errors = validationResult(req);
    if (!errors.isEmpty()) {
        return res.status(400).json({ errors: errors.array() });
    }
    res.send('User registered');
});
18.6 mongoose – Work with MongoDB
- The most popular library for making MongoDB easier to use with Node.js.
Usage:
const mongoose = require('mongoose');
mongoose.connect('mongodb://localhost/my_db');
18.7 jsonwebtoken – Auth with Tokens
- Creates and verifies login tokens (JWTs) for authentication.
Usage:
const jwt = require('jsonwebtoken');
const token = jwt.sign({ id: 'user123' }, 'secret');
18.8 multer – File Uploads
- A middleware for handling `multipart/form-data`, which is primarily used for uploading files like images, documents, etc.
Usage:
const multer = require('multer');
const upload = multer({ dest: 'uploads/' });
app.post('/upload', upload.single('avatar'), (req, res) => {
    res.send('File uploaded');
});
18.9 chalk – Colorful Logs
- Makes your terminal messages colorful, which is great for debugging and logging.
Usage:
const chalk = require('chalk');
console.log(chalk.green('Success!'));
console.log(chalk.red.bold('Error!'));
18.10 uuid – Unique IDs
- Generates unique IDs (Universally Unique Identifiers) for users, files, database records, etc.
Usage:
const { v4: uuidv4 } = require('uuid');
const id = uuidv4(); // Generates a unique ID
19. COMMON BEGINNER MISTAKES
Avoid these common mistakes to become a better Node.js developer:
19.1 Blocking the Event Loop
- ❌ Writing long-running synchronous code that blocks Node.js from handling other requests.
- Bad:
// This will block other requests from being processed
function longRunningTask() {
    let i = 0;
    while (i < 1000000000) { i++; }
    return 'Done';
}
✅ Use asynchronous operations or worker threads for long tasks.
19.2 Ignoring Error Handling
- ❌ Not using
try/catch for `async/await` or .catch() for promises can crash your application.
- Good:
async function someFunction() {
    try {
        const data = await fetchData();
        console.log(data);
    } catch (error) {
        console.error('Error:', error);
    }
}
19.3 Improper Module Imports
- ❌ Mixing CommonJS (`require`) and ES Modules (`import`) syntax incorrectly.
- Bad (in a CommonJS file):
import { myFunction } from './myModule.mjs'; // This will cause an error
Stick to one module system per project or configure it correctly.
19.4 Hardcoding Sensitive Info
- ❌ Storing passwords, API keys, or other secrets directly in your code.
- Bad:
const API_KEY = 'your_hardcoded_api_key';
Good:
require('dotenv').config();
const API_KEY = process.env.API_KEY;
Always use a .env file and never commit it to version control.