1. INTRODUCTION TO REACT
1.1 What is React?
React is a JavaScript library used to build user interfaces (UIs). That means it helps you create the parts of a website that users can see and interact with.
React is especially good for building single-page applications (SPAs) - websites that update the content without reloading the entire page. For example, when you scroll Instagram, the page doesn't reload, but new content appears - that's similar to how React works.
In simple words: React helps you build websites that are fast, easy to manage, and don't reload every time something changes.
1.2 History and Features
- Created by: Jordan Walke, a software engineer at Facebook
- Released in: 2013 (open-sourced)
- Used by: Facebook, Instagram, Netflix, WhatsApp Web, etc.
Key Features:
- Component-based: You build UI in small pieces called components.
- Reusable: One component can be used in many places.
- Virtual DOM: It updates only the changed part of the page instead of the whole page.
- Fast and Efficient: Because of virtual DOM and smart updates.
1.3 Virtual DOM Explained
DOM stands for Document Object Model - it's like a tree structure of your HTML.
- React creates a copy of the real DOM in memory. This copy is called the Virtual DOM.
- When something changes, React compares the virtual DOM with the real DOM and only updates the parts that actually changed.
- This makes the website faster, because it doesn't reload everything.
1.4 React vs Vanilla JS vs Other Frameworks
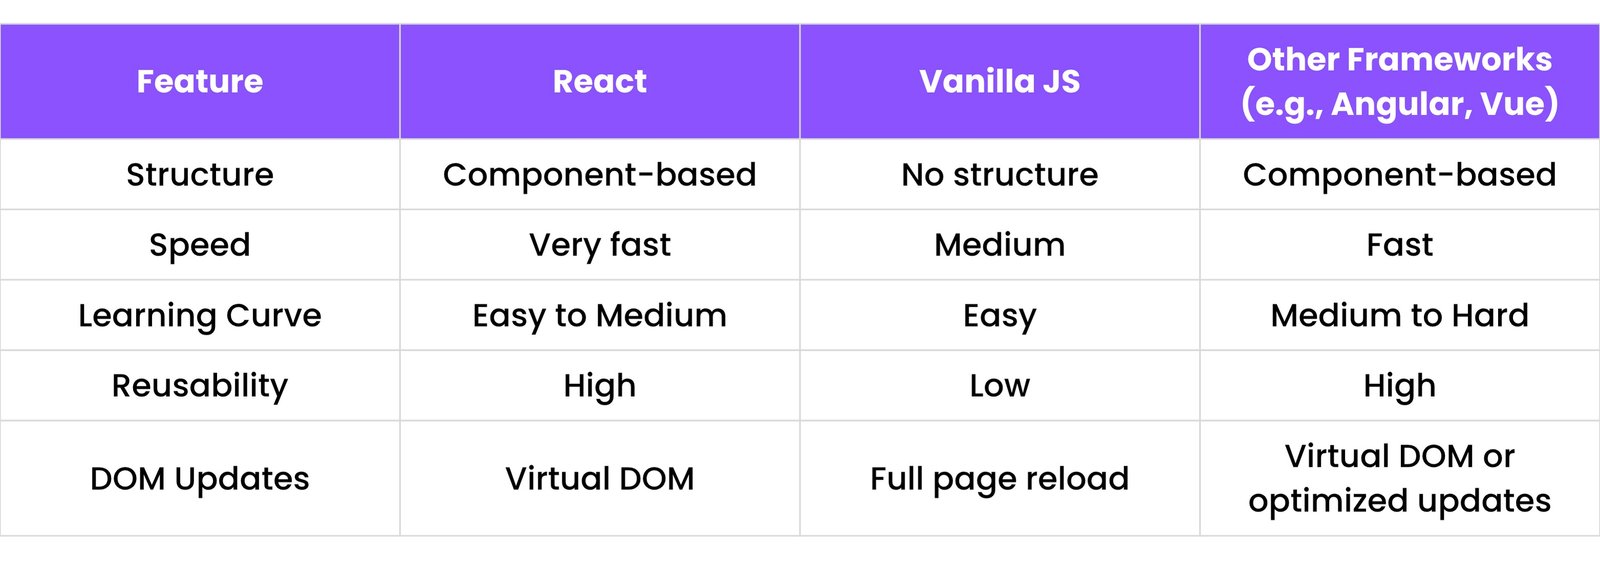
Conclusion: React offers a balanced approach - faster than plain JavaScript and easier to learn than some heavy frameworks like Angular.
2. ENVIRONMENT SETUP
2.1 Installing Node.js and npm
React apps need Node.js and npm (Node Package Manager) to work.
Steps:
- Go to https://nodejs.org
- Download the LTS version (Recommended for most users)
- Install it
After installing, open your terminal and check versions:
node -v
npm -v
If you see the versions, Node.js and npm are installed correctly.
2.2 Create React App (CRA)
React provides a tool called Create React App (CRA) to start building apps quickly.
To create a project:
npx create-react-app my-app
cd my-app
npm start
- "npx" runs a command without installing it globally.
- "create-react-app" sets up everything for you.
- "npm start" runs your app in the browser.
2.3 Project Structure
When you create a React app, you'll see a folder like this:
my-app/
├── node_modules/
├── public/
│   └── index.html
└── src/
    ├── App.js
    └── index.js
    └── package.json
public/index.html: Main HTML filesrc/index.js: Starting point of your React appsrc/App.js: Main component
2.4 Using Vite for Faster Setup
Vite is a modern build tool that's faster than CRA.
To create a Vite project:
npm create vite@latest my-vite-app
cd my-vite-app
npm install
npm run dev
Vite starts faster and is better for modern projects.
3. JSX BASICS
3.1 What is JSX?
JSX stands for JavaScript XML. It lets you write HTML-like code inside JavaScript.
Example:
const element = <h1>Hello, world!</h1>;
This looks like HTML, but it's actually JavaScript code.
3.2 JSX Syntax Rules
Return only one parent element.
return (
    <div>
        <h1>Title</h1>
        <p>Paragraph</p>
    </div>
);
Use camelCase for attributes like className, onClick:
<button className="btn" onClick={handleClick}>Click Me</button>
3.3 Embedding Expressions
You can write JavaScript inside JSX using { }.
Example:
const name = "Rudra";
return <h1>Hello, {name}</h1>;
3.4 JSX Best Practices
- Use meaningful names for variables and components.
- Keep JSX clean and readable.
- Avoid too much logic inside JSX.
- Use fragments (
<></>) if you don’t want to wrap everything in a <div>.
4. COMPONENTS
4.1 Functional Components
A simple way to create a component using a function.
function Welcome() {
  return <h1>Hello from Functional Component!</h1>;
}
4.2 Class Components
Another way using ES6 class (older way).
import React, { Component } from 'react';
class Welcome extends Component {
  render() {
    return <h1>Hello from Class Component!</h1>;
  }
}
4.3 Component Naming and Structure
Always start component names with Capital letters.
Each component should be in its own file.
// Header.jsx
function Header() {
  return <h1>This is a header</h1>;
}
export default Header;
4.4 Props in Components
Props (short for properties) are used to pass data from one component to another.
Used like:
function Greet(props) {
  return <h1>Hello, {props.name}!</h1>;
}
// Usage: <Greet name="Rudra" />
4.5 Props Destructuring
Instead of props.name, you can do:
function Greet({ name }) {
  return <h1>Hello, {name}!</h1>;
}
4.6 Children Props
Props can also include inner HTML using props.children.
function Layout(props) {
  return <div>{props.children}</div>;
}
// Usage: <Layout><p>This is content inside the layout</p></Layout>
5. STATE MANAGEMENT
5.1 useState Hook
For functional components, we use the useState hook to manage data.
import { useState } from 'react';
function Counter() {
  const [count, setCount] = useState(0);
  return (
    <div>
      <p>Count: {count}</p>
      <button onClick={() => setCount(count + 1)}>Add</button>
    </div>
  );
}
5.2 setState in Class Components
In class components, we use this.state and this.setState().
class Counter extends React.Component {
  constructor(props) {
    super(props);
    this.state = { count: 0 };
  }
  render() {
    return (
      <div>
        <p>Count: {this.state.count}</p>
        <button onClick={() => this.setState({ count: this.state.count + 1 })}>
          Add
        </button>
      </div>
    );
  }
}
5.3 Lifting State Up
When two components need to share the same state, move the state to their common parent.
function Parent() {
  const [value, setValue] = useState("");
  return (
    <div>
      <ChildInput value={value} onChange={setValue} />
      <ChildDisplay value={value} />
    </div>
  );
}
5.4 Passing State as Props
You can pass the current state value to another component using props.
function Display({ value }) {
  return <p>You typed: {value}</p>;
}
6. EVENT HANDLING
6.1 Handling Events in React
In React, we can handle user actions like clicks, typing, or hovering using event handlers.
Example: Button click
function MyButton() {
  function handleClick() {
    alert("Button was clicked!"); // Using alert for simplicity
  }
  return <button onClick={handleClick}>Click Me</button>;
}
Note: We use camelCase like onClick instead of onclick.
6.2 Event Binding
In class components, we often need to bind the event handler to this.
class MyForm extends React.Component {
  constructor(props) {
    super(props);
    this.state = { name: "Rudra" };
    this.handleClick = this.handleClick.bind(this);
  }
  handleClick() {
    alert("Hello " + this.state.name);
  }
  render() {
    return <button onClick={this.handleClick}>Greet</button>;
  }
}
In functional components, you don’t need binding.
6.3 Synthetic Events
React uses a system called Synthetic Events. It wraps browser events to work the same way across all browsers.
It behaves like regular JavaScript events but works consistently everywhere.
Example:
function handleChange(event) {
  console.log(event.target.value);
}
6.4 Prevent Default and Event Objects
If you want to stop the default action (like refreshing the page on form submit), use event.preventDefault().
Example:
function MyForm() {
  function handleSubmit(e) {
    e.preventDefault(); // Prevents page reload
    alert("Form submitted!"); // Using alert for simplicity
  }
  return <form onSubmit={handleSubmit}><button type="submit">Submit</button></form>;
}
7. CONDITIONAL RENDERING
7.1 if/else Statements
You can use normal if/else logic before the return.
function Greeting(props) {
  if (props.isLoggedIn) {
    return <h1>Welcome back!</h1>;
  }
  return <h1>Please log in.</h1>;
}
7.2 Ternary Operators
Short way to write if/else inside JSX:
return (
  <div>
    {isLoggedIn ? <p>Welcome User!</p> : <p>Please Sign In!</p>}
  </div>
);
7.3 Logical && Operator
Use && when you want to render something only if a condition is true.
return (
  <div>
    {cart.length > 0 && <p>You have items in cart!</p>}
  </div>
);
If cart.length is 0, it won’t show anything.
7.4 Switch Statements
For multiple conditions, you can use switch.
function StatusMessage({ status }) {
  switch (status) {
    case "loading":
      return <p>Loading...</p>;
    case "success":
      return <p>Data loaded!</p>;
    case "error":
      return <p>Error occurred.</p>;
    default:
      return <p>Unknown status</p>;
  }
}
8. LISTS AND KEYS
8.1 Rendering Lists with .map()
When you want to show many items, use .map() to loop through them.
const fruits = ["Apple", "Banana", "Mango"];
function FruitList() {
  return (
    <ul>
      {fruits.map((fruit, index) => (
        <li key={index}>{fruit}</li>
      ))}
    </ul>
  );
}
8.2 Using key Props
Each item in a list needs a unique key so React can track changes.
<li key={fruit.id}>{fruit.name}</li>
Use a unique ID if available (don’t always rely on index).
8.3 Handling Empty Lists
You can check if the list is empty before showing it.
return (
  <div>
    {fruits.length === 0 ? <p>No fruits available</p> : <FruitList />}
  </div>
);
9. FORMS IN REACT
9.1 Controlled vs Uncontrolled Components
- Controlled Component: React controls the input value using
useState.
- Uncontrolled Component: DOM handles the input using a ref.
Controlled example:
const [name, setName] = useState("");
<input value={name} onChange={(e) => setName(e.target.value)} />
9.2 Handling Inputs (text, checkbox, radio, select)
Text:
<input type="text" value={name} onChange={(e) => setName(e.target.value)} />
Checkbox:
<input type="checkbox" checked={isChecked} onChange={(e) => setIsChecked(e.target.checked)} />
Radio:
<input type="radio" value="Male" name="gender" checked={selectedGender === 'Male'} onChange={(e) => setSelectedGender(e.target.value)} />
Select dropdown:
<select value={city} onChange={(e) => setCity(e.target.value)}>
  <option value="Delhi">Delhi</option>
  <option value="Mumbai">Mumbai</option>
</select>
9.3 Form Submission
function MyForm() {
  const [name, setName] = useState("");
  function handleSubmit(e) {
    e.preventDefault(); // Prevents page reload
    alert("Submitted name: " + name); // Using alert here for simplicity
  }
  return (
    <form onSubmit={handleSubmit}>
      <input value={name} onChange={(e) => setName(e.target.value)} />
      <button type="submit">Submit</button>
    </form>
  );
}
9.4 Form Validation Basics
Before submitting, check if the inputs are correct.
function handleSubmit(e) {
  e.preventDefault();
  if (name === "") {
    alert("Name is required!"); // Using alert for simplicity
    return;
  }
  // ... submit form
}
10. USEEFFECT HOOK
10.1 Basic Usage of useEffect
“useEffect” lets you run code after your component renders.
Example:
useEffect(() => {
  console.log("Component mounted!");
});
10.2 Dependency Array
You can control when useEffect runs using dependencies.
- Empty array
[]: run only once (like on mount)
useEffect(() => {
  console.log("Component mounted!");
}, []);
With [name]: run when name changes
useEffect(() => {
  console.log("Name changed!");
}, [name]);
10.3 Cleanup Function
If you want to clean up something (like removing a timer), return a function inside useEffect.
useEffect(() => {
  const timer = setInterval(() => {
    console.log("Tick");
  }, 1000);
  return () => {
    clearInterval(timer); // Cleanup
  };
}, []);
10.4 Fetching Data on Mount
useEffect(() => {
  async function fetchData() {
    const res = await fetch("https://api.example.com/data");
    const data = await res.json();
    // setData(data);
  }
  fetchData();
}, []);
It runs once after the component loads and gets the data.
11. OTHER REACT HOOKS
11.1 useRef
useRef is used to store a value that doesn’t need to re-render the component.
It’s also used to directly access a DOM element (like an input box).
import { useRef } from 'react';
function MyFormInput() {
  const inputRef = useRef(null);
  function focusInput() {
    inputRef.current.focus();
  }
  return (
    <div>
      <input ref={inputRef} />
      <button onClick={focusInput}>Focus Input</button>
    </div>
  );
}
11.2 useContext
It helps to share values like user info or theme between components without props.
import { useContext, createContext } from 'react';
const ThemeContext = createContext("light");
// ... Later in App.js
// <ThemeContext.Provider value="dark">
//   <MyComponent />
// </ThemeContext.Provider>
// In a child component
function ThemeDisplay() {
  const theme = useContext(ThemeContext);
  return <p>The theme is: {theme}</p>;
}
11.3 useReducer
Like useState, but better when state is complex (like a counter with actions).
import { useReducer } from 'react';
function reducer(state, action) {
  if (action.type === 'increment') return { count: state.count + 1 };
  return state;
}
function MyCounter() {
  const [state, dispatch] = useReducer(reducer, { count: 0 });
  return (
    <div>
      <p>Count: {state.count}</p>
      <button onClick={() => dispatch({ type: 'increment' })}>Add</button>
    </div>
  );
}
11.4 useMemo
Stops a function from running again if the inputs (dependencies) didn’t change.
const memoizedValue = useMemo(() => expensiveCalculation(a, b), [a, b]);
11.5 useCallback
Stops a function from re-creating again and again.
const memoizedCallback = useCallback(() => { doSomething(a, b); }, [a, b]);
11.6 Custom Hooks
Your own reusable hook logic using other hooks.
function useMyDisplay() {
  const [count, setCount] = useState(0);
  const increment = () => setCount(count + 1);
  return { count, increment };
}
12. REACT ROUTER (V6+)
12.1 Installation
npm install react-router-dom@6
12.2 BrowserRouter, Routes, Route
import { BrowserRouter, Routes, Route } from "react-router-dom";
<BrowserRouter>
  <Routes>
    <Route path="/" element={<Home />} />
    <Route path="/about" element={<About />} />
  </Routes>
</BrowserRouter>
12.3 Link and NavLink
import { Link, NavLink } from "react-router-dom";
<Link to="/about">About</Link>
<NavLink to="/about">About</NavLink> // Adds 'active' class automatically
12.4 Route Parameters
<Route path="/users/:id" element={<User />} />
Use useParams() in User component to get the id.
12.5 Nested Routes
<Route path="/dashboard" element={<Dashboard />}>
  <Route path="profile" element={<Profile />} />
</Route>
12.6 Redirects and Navigate
import { Navigate } from "react-router-dom";
<Navigate to="/login" />
12.7 404 Page Setup
<Route path="*" element={<NotFound />} />
13. CONTEXT API
13.1 Creating and Providing Context
const MyContext = createContext(null);
<MyContext.Provider value={value}>
  <Children />
</MyContext.Provider>
13.2 Consuming Context
const value = useContext(MyContext);
13.3 Updating Context
Use useState and pass both value and function via value.
const [theme, setTheme] = useState("light");
<ThemeContext.Provider value={{ theme, setTheme }}>
  // ...
</ThemeContext.Provider>
13.4 Context vs Props

Use props if data is used only by child.
Use context when many components need the data.
14. STATE MANAGEMENT LIBRARIES
14.1 Redux (Basics)
A central store to keep all app data.
Use actions to update data.
import { createStore } from "redux";
function counterReducer(state = { count: 0 }, action) {
  if (action.type === 'increment') {
    return { count: state.count + 1 };
  }
  return state;
}
const store = createStore(counterReducer);
14.2 Redux Toolkit
Easier way to write Redux
import { configureStore, createSlice } from '@reduxjs/toolkit';
const counterSlice = createSlice({
  name: 'counter',
  initialState: { count: 0 },
  reducers: {
    increment: state => { state.count += 1; }
  }
});
const store = configureStore({ reducer: counterSlice.reducer });
14.3 useSelector and useDispatch
import { useSelector, useDispatch } from 'react-redux';
const count = useSelector(state => state.count);
const dispatch = useDispatch();
14.4 Zustand
Lightweight library, less setup.
import create from 'zustand';
const useStore = create(set => ({
  count: 0,
  increment: () => set(state => ({ count: state.count + 1 }))
}));
14.5 Recoil
Works with atoms (like small pieces of state).
import { atom, useRecoilValue } from 'recoil';
const counterState = atom({
  key: 'count',
  default: 0,
});
14.6 Context vs Redux
Refer to section 13.4 for the comparison table.
15. STYLING IN REACT
15.1 CSS Modules
import styles from './App.module.css';
<div className={styles.myClass}>Text</div>
15.2 Inline Styling
<div style={{ color: 'red', fontSize: '20px' }}>Hello</div>
15.3 Styled Components
import styled from 'styled-components';
const MyButton = styled.button`
  background: red;
  color: white;
`;
15.4 Tailwind CSS
<div className="bg-blue-500 p-4 text-white rounded-lg">Hello</div>
15.5 SCSS / SASS
// Example: style.scss
.my-component {
  color: #333;
  .title {
    font-size: 20px;
  }
}
import './style.scss'; // Needs a Sass loader
16. REACT LIFECYCLE (CLASS COMPONENTS)
In class components, lifecycle methods let you run code at specific times in a component’s life (mount, update, unmount).
16.1 constructor()
Runs first, when the component is created.
Used to initialize state and bind methods.
constructor(props) {
  super(props);
  this.state = { count: 0 };
}
16.2 render()
Required method.
Returns JSX to display on the screen.
render() {
  return <div>Hello</div>;
}
16.3 componentDidMount()
Called after component is added to the DOM.
Good for API calls or timers.
componentDidMount() {
  console.log("Component mounted!");
}
16.4 componentDidUpdate()
Runs when props or state change.
Good for updating based on changes.
componentDidUpdate(prevProps, prevState) {
  if (prevState.count !== this.state.count) {
    console.log("Count updated!");
  }
}
16.5 componentWillUnmount()
Called before component is removed.
Use it to clear timers or remove listeners
componentWillUnmount() {
  clearInterval(this.timerId);
}
17. ERROR HANDLING
17.1 Error Boundaries
A special class component that catches JavaScript errors in children.
class ErrorBoundary extends React.Component {
  constructor(props) {
    super(props);
    this.state = { hasError: false };
  }
  static getDerivedStateFromError(error) {
    return { hasError: true };
  }
  componentDidCatch(error, errorInfo) {
    console.error("Error Boundary caught:", error, errorInfo);
  }
  render() {
    if (this.state.hasError) {
      return <h1>Something went wrong.</h1>;
    }
    return this.props.children;
  }
}
// Usage: <ErrorBoundary><MyComponentThatMightFail /></ErrorBoundary>
17.2 Try-Catch in Event Handlers
function handleClick() {
  try {
    // Code that might throw an error
  } catch (error) {
    console.error("Error in click handler:", error);
  }
}
17.3 Handling Async Errors
useEffect(() => {
  async function fetchData() {
    try {
      // ... fetch logic
    } catch (error) {
      console.error("Error fetching data:", error);
    }
  }
  fetchData();
}, []);
18. CODE SPLITTING AND LAZY LOADING
18.1 React.lazy() and Suspense
React.lazy() loads components only when needed.
const OtherComponent = React.lazy(() => import('./OtherComponent'));
function MyPage() {
  return (
    <React.Suspense fallback={<div>Loading...</div>}>
      <OtherComponent />
    </React.Suspense>
  );
}
18.2 Dynamic Imports
Load parts of the code only when needed (saves load time).
import('./math').then(math => {
  console.log(math.add(2, 3));
});
18.3 Loading Spinners
Use during lazy loading or data fetching.
{isLoading ? <Spinner /> : <Content />}
19. REFS AND DOM MANIPULATION
19.1 useRef and Accessing DOM Elements
useRef() returns a reference to a DOM node.
import { useRef } from 'react';
function MyInput() {
  const inputRef = useRef(null);
  // ...
  return <input ref={inputRef} />;
}
19.2 Forwarding Refs
Pass a ref to child from parent.
const MyInput = React.forwardRef((props, ref) => (
  <input ref={ref} {...props} />
));
// Usage: <MyInput ref={myRef} />
19.3 DOM Interaction Best Practices
- Prefer React state.
- Use refs only when you must access DOM (e.g., focus, scroll).
- Avoid modifying DOM directly (don’t use
document.querySelector).
20. PORTALS
20.1 What is a Portal?
Normally, in React, all components render inside a single root element — like this:
<div id="root">
  <App />
</div>
But what if you want to show something outside this root? For example, a popup, a modal, or a tooltip that appears on top of everything.
That’s where Portals help.
A Portal lets you render a React component into a different part of the HTML, outside the main app root.
20.2 How to Create a Portal
Step 1: Add a new HTML element in index.html
Open your public/index.html file and add a new <div> for the portal:
<body>
  <div id="root"></div>
  <div id="portal-root"></div>
</body>
Step 2: Use createPortal() in your component
import ReactDOM from 'react-dom';
function PortalComponent({ children }) {
  const portalRoot = document.getElementById('portal-root');
  return ReactDOM.createPortal(children, portalRoot);
}
You can now use this PortalComponent in your app.
20.3 Full Example: Modal with Portal
Let’s create a simple modal that opens and closes using a portal.
Modal.jsx
import React from 'react';
import ReactDOM from 'react-dom';

function Modal({ isOpen, onClose, children }) {
  if (!isOpen) return null;

  return ReactDOM.createPortal(
    <div style={{
      position: 'fixed', top: 0, left: 0, right: 0, bottom: 0,
      backgroundColor: 'rgba(0,0,0,0.5)', display: 'flex',
      alignItems: 'center', justifyContent: 'center'
    }}>
      <div style={{ background: 'white', padding: '20px', borderRadius: '8px' }}>
        {children}
        <button onClick={onClose}>Close Modal</button>
      </div>
    </div>,
    document.getElementById('portal-root')
  );
}
App.jsx
import React, { useState } from 'react';
import Modal from './Modal'; // Assuming Modal.jsx is in the same directory

function App() {
  const [isModalOpen, setIsModalOpen] = useState(false);

  return (
    <div>
      <h1>My App Content</h1>
      <button onClick={() => setIsModalOpen(true)}>Open Modal</button>

      <Modal isOpen={isModalOpen} onClose={() => setIsModalOpen(false)}>
        <h2>This is a Modal!</h2>
        <p>Content rendered via a React Portal.</p>
      </Modal>
    </div>
  );
}
export default App;
20.4 Use Cases of Portals
- Modals/Popups: When you want a window to appear on top of everything else.
- Tooltips: Small hint boxes that appear on hover.
- Dropdown Menus: If a dropdown needs to overflow a parent with
overflow: hidden.
- Sidebars or Toast Messages: For alerts or temporary notifications.
20.5 Why Use Portals?
- It solves CSS issues when the parent component has
overflow: hidden, z-index, or position: relative.
- Keeps UI elements like modals and tooltips outside the normal hierarchy.
- Cleaner and more flexible design.
21. FRAGMENTS AND STRICTMODE
21.1 <React.Fragment> and <>...</>
In React, a component must return a single parent element.
But what if you need to return multiple elements without wrapping them in a <div>?
Use Fragments!
Example:
function MyComponent() {
  return (
    <>
      <h1>Title</h1>
      <p>Paragraph</p>
    </>
  );
}
Why Use It?
- No extra
<div> tags in the DOM.
- Keeps code clean.
21.2 <React.StrictMode>
React provides a special wrapper that helps you find bugs early.
What it does:
- Warns about unsafe code.
- Helps with future-proofing your app.
- Does not show anything to the user.
- Works only in development (not in production).
import React from 'react';
import ReactDOM from 'react-dom/client';
import App from './App';

const root = ReactDOM.createRoot(document.getElementById('root'));
root.render(
  <React.StrictMode>
    <App />
  </React.StrictMode>
);
22. HIGHER ORDER COMPONENTS (HOC)
22.1 What is an HOC?
An HOC is a function that takes a component and returns a new component.
Think of it like adding extra powers to a component.
22.2 Example: withLogger HOC
function withLogger(WrappedComponent) {
  return function LoggerComponent(props) {
    console.log(`Component ${WrappedComponent.name} rendered with props:`, props);
    return <WrappedComponent {...props} />;
  };
}
Now use it:
const LoggedButton = withLogger(MyButton);
// <LoggedButton text="Click Me" />
22.3 Common HOC Use Cases
- Logging props
- Adding loading spinners
- Access control (admin vs normal user)
- Reusing logic across components
22.4 Pros and Cons
Pros
- Reuse logic easily
- Cleaner components
Cons
- Can become complex to debug
- Not as popular now (Hooks are preferred)
23. CUSTOM HOOKS
23.1 When to Create Custom Hooks
When you find yourself copying the same useEffect, useState, or logic in multiple places — create a custom hook.
23.2 Example: useLocalStorage
import { useState, useEffect } from 'react';
function useLocalStorage(key, initialValue) {
  const [storedValue, setStoredValue] = useState(() => {
    try {
      const item = window.localStorage.getItem(key);
      return item ? JSON.parse(item) : initialValue;
    } catch (error) {
      console.log(error);
      return initialValue;
    }
  });
  useEffect(() => {
    window.localStorage.setItem(key, JSON.stringify(storedValue));
  }, [key, storedValue]);
  return [storedValue, setStoredValue];
}
Usage:
const [name, setName] = useLocalStorage('name', 'Alice');
23.3 Another Example: useWindowSize
import { useState, useEffect } from 'react';
function useWindowSize() {
  const [windowSize, setWindowSize] = useState({
    width: undefined,
    height: undefined,
  });
  useEffect(() => {
    function handleResize() {
      setWindowSize({
        width: window.innerWidth,
        height: window.innerHeight,
      });
    }
    window.addEventListener("resize", handleResize);
    handleResize(); // Set initial size
    return () => window.removeEventListener("resize", handleResize);
  }, []);
  return windowSize;
}
Usage:
const { width, height } = useWindowSize();
23.4 Best Practices
- Always start with
use
- Return only what’s needed
- Keep it simple
24. TESTING REACT APPS
24.1 Unit Testing with Jest
Jest is a testing framework for JavaScript.
✅ Example test:
import { render, screen } from '@testing-library/react';
import Button from './Button';

test('renders learn react link', () => {
  render(<Button text="Click Me" />);
  const buttonElement = screen.getByText(/Click Me/i);
  expect(buttonElement).toBeInTheDocument();
});
24.2 Component Testing with React Testing Library
React Testing Library helps you test how a user would interact.
import { render, fireEvent } from '@testing-library/react';
import MyForm from './MyForm';

test('form submission', () => {
  const { getByText, getByPlaceholderText } = render(<MyForm />);
  const input = getByPlaceholderText('Enter Name');
  const button = getByText('Submit');

  fireEvent.change(input, { target: { value: 'John Doe' } });
  fireEvent.click(button);

  // Assertions after submission
});
24.3 Testing Hooks
For hooks, use @testing-library/react-hooks or test them inside a component.
import { renderHook, act } from '@testing-library/react-hooks';
import { useCounter } from './useCounter';

test('should increment counter', () => {
  const { result } = renderHook(() => useCounter());
  act(() => {
    result.current.increment();
  });
  expect(result.current.count).toBe(1);
});
25. DEPLOYMENT
25.1 Build for Production
Run this in the terminal:
npm run build
It creates a build/ folder with all optimized files.
25.2 Hosting on Vercel
- Go to https://vercel.com
- Connect your GitHub repo
- Click "Deploy"
Done ✅
25.3 Hosting on Netlify
- Go to https://netlify.com
- Drag your
build folder
- Or connect GitHub and deploy automatically
25.4 Hosting on Firebase
npm install -g firebase-tools
firebase login
firebase init
firebase deploy
Choose "Hosting" and follow the steps.
25.5 GitHub Pages
Install the package:
npm install --save-dev gh-pages
Add to package.json:
"homepage": "http://myusername.github.io/my-app",
"scripts": {
  "predeploy": "npm run build",
  "deploy": "gh-pages -d build"
}
Then run:
npm run deploy
25.6 Environment Variables
You can use environment variables for API keys or settings.
Create a .env file:
REACT_APP_API_URL=https://api.example.com
Use in code:
console.log(process.env.REACT_APP_API_URL);
26. REACT WITH APIS
26.1 Fetching with fetch and axios
➤ Using fetch:
useEffect(() => {
  fetch('https://api.example.com/data')
    .then(response => response.json())
    .then(data => console.log(data));
}, []);
➤ Using axios:
import axios from 'axios';
useEffect(() => {
  axios.get('https://api.example.com/data')
    .then(response => console.log(response.data));
}, []);
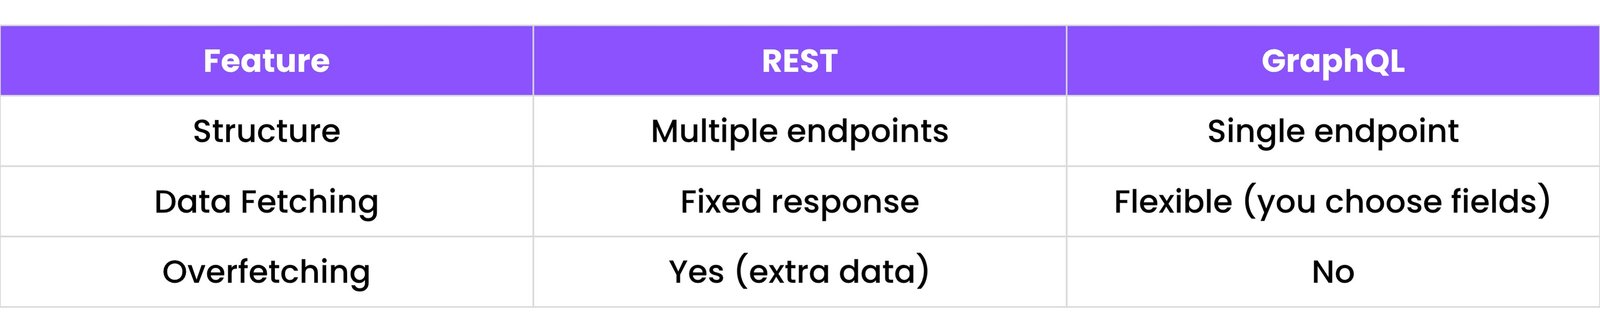
26.2 REST vs GraphQL
26.3 Error Handling in API Calls
fetch('https://api.example.com/data')
  .then(response => {
    if (!response.ok) {
      throw new Error('Network response was not ok');
    }
    return response.json();
  })
  .then(data => console.log(data))
  .catch(error => console.error('There has been a problem with your fetch operation:', error));
26.4 Displaying Loading States
const [isLoading, setIsLoading] = useState(true);
useEffect(() => {
  // Simulate fetching data
  setTimeout(() => {
    setIsLoading(false);
  }, 2000);
}, []);
return <div>{isLoading ? <p>Loading...</p> : <p>Data Loaded!</p>}</div>;
27. BEST PRACTICES & OPTIMIZATION
27.1 Component Reusability
Create reusable components like Button, Input, Card instead of repeating code.
27.2 Code Splitting
Use React.lazy() to load components only when needed.
27.3 Avoiding Unnecessary Renders
Use React.memo to prevent re-render when props haven’t changed.
const MyComponent = React.memo(function MyComponent(props) {
  /* render using props */
});
27.4 Memoization
Use useMemo or useCallback for expensive calculations or stable function references.
27.5 Folder Structure Recommendation
src/
├── components/
│   ├── Button/
│   │   ├── Button.jsx
│   │   └── Button.module.css
│   └── Card/
├── pages/
│   ├── Home.jsx
│   └── About.jsx
├── App.jsx
├── index.js
└── styles/
    └── global.css
28. REACT WITH TYPESCRIPT (BONUS)
28.1 Why Use TypeScript?
- Catch errors before runtime
- Better developer experience with IntelliSense
- Safer code with types
28.2 Typing Props and State
interface UserProps {
  name: string;
  age?: number; // Optional prop
}
function User({ name, age }: UserProps) { /* ... */ }

interface CounterState {
  count: number;
}
const [state, setState] = useState<CounterState>({ count: 0 });
28.3 Typing useEffect and useRef
useEffect(() => { /* ... */ }, [dependency1, dependency2]);
const inputRef = useRef<HTMLInputElement>(null);
28.4 Interfaces and Types
interface Product {
  id: number;
  name: string;
  price: number;
}

type UserStatus = 'active' | 'inactive';